Tuesday, January 11, 2011

Chicken Noodle Soup

Cold winter days = warm chicken noodle soup for dinner - Yum!


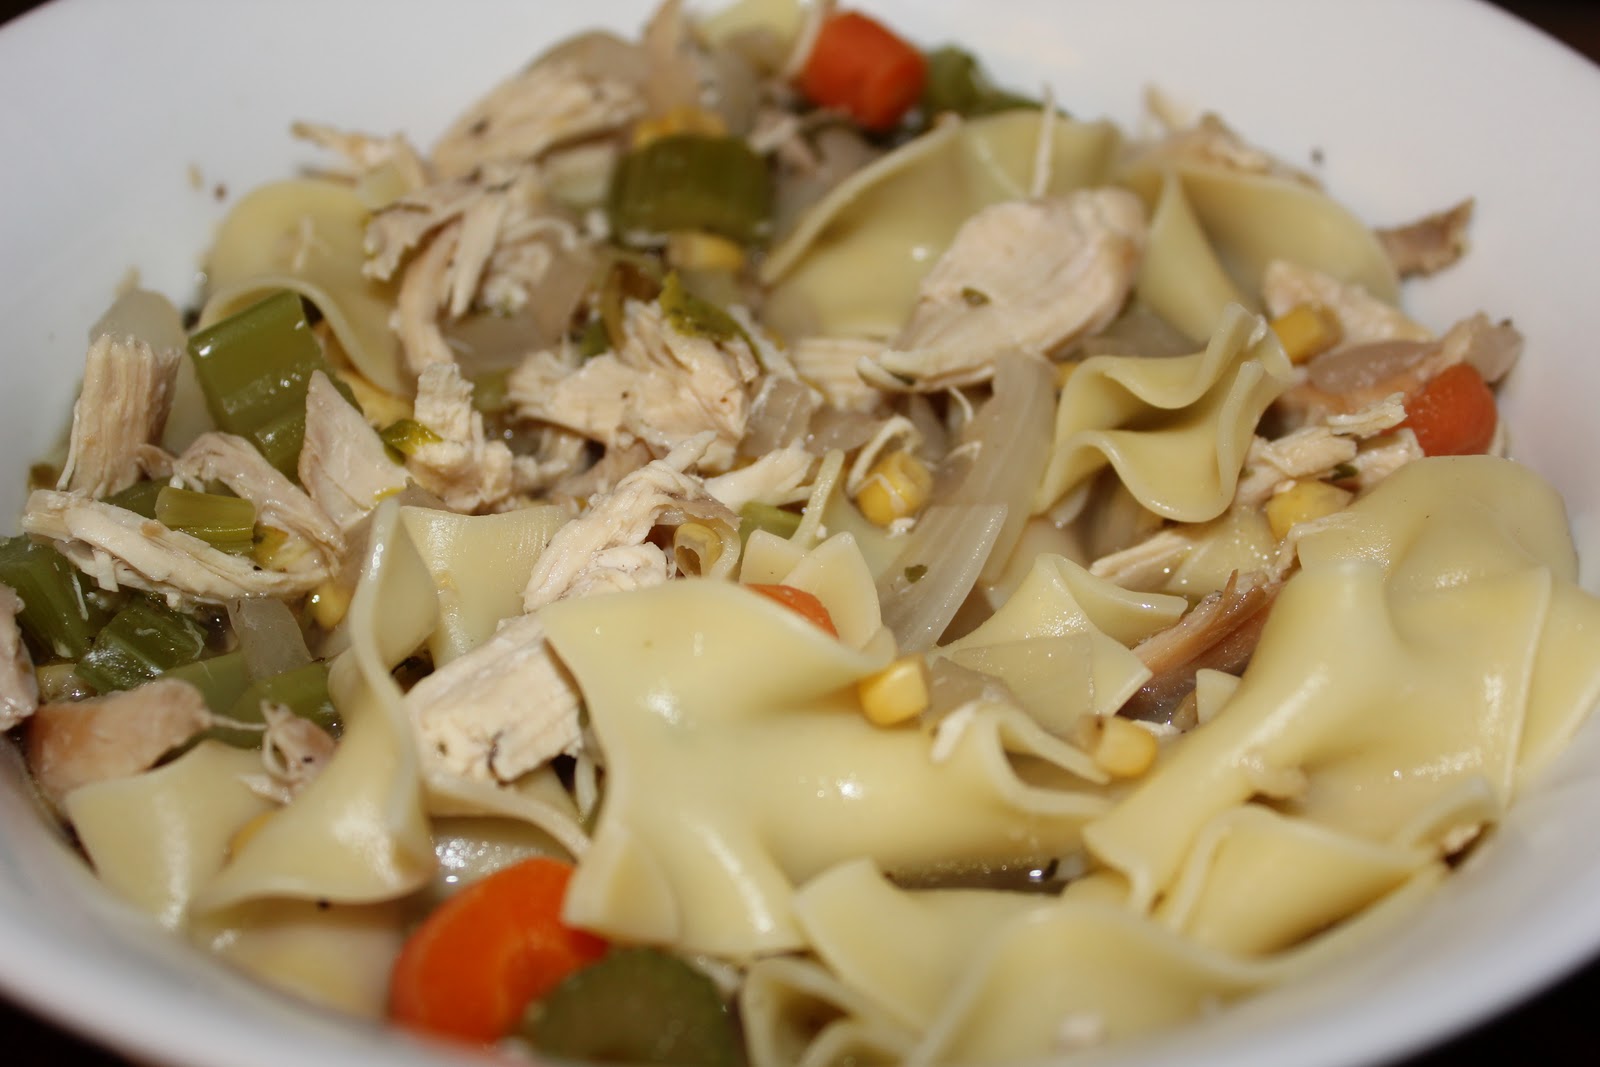
My mom made a chicken noodle recipe not too long ago during one our visits and I thought to myself – there’s something I should try to make without following a recipe. It’s a pretty basic soup actually, so even in my cooking hiatus (otherwise known as pregnancy) I knew this wouldn’t take much effort. My little bit of effort, however, paid off; I even have enough left over for dinner another night this week….I think a grilled cheese sandwich sounds like the perfect pairing! Mmmmmmm…

Normal chicken noodle soup recipes don’t call for Herbs de Provence, so this special herb does bring a unique flavor to the mix (it’s the lavender). If you don’t particularly like the flavor of Herbs de Provence, I recommend substituting some rosemary and thyme, but give it a shot and I think you’ll be pleasantly surprised.

I also enjoy using a rotisserie chicken for my soup as well – I find that the slow roasting brings a depth of flavor that plain chicken just doesn’t seem to offer. For this particular go-round, I bought my own at the store, but if you wanted to spend the quality time to roast your chicken first, it would be a great addition and probably well worth your time. Barefoot Contessa has a GREAT roast chicken recipe that I think would be delicious to use in this soup.

Time from Prep to Eating: 1-1.5 hours

What You Need:
2 large stock pots

The Stuff:
1 Tbsp canola oil
1 tsp Herbs de Provence
½ tsp dried oregano
½ tsp dried parsley
½ tsp pepper
1 tsp salt
4 garlic cloves, minced
4 celery stalks, roughly chopped
4 carrots, roughly chopped into medallions
1 large onion, chopped
1 small can corn, drained
1 rotisserie chicken, skinned, and shredded into bit-sized pieces
6 cups of low sodium chicken broth
2 cups water

Here’s What You Do:
Preheat your stock pot over medium-low (more towards the lower side) heat for about 5 minutes. Add the oil, garlic and herbs (from Herbs de Provence to salt), stirring constantly to avoid burning for about 1-2 minutes. Then add the celery, carrots and onion and let them sweat for 5 minutes, stirring occasionally. Once the onions become semi-translucent, add the corn, chicken broth and water and bring to a simmer for about 30 minutes. Turn off the heat and fold in the chicken, let sit for about 5 minutes to cool.

Cook your noodles separately following the instructions on the box. I find that cooking them separately makes for a less soggy noodle – especially when it comes to the leftovers. This is a VERY important piece of the recipe!

Serve with your favorite loaf of bread for dipping!

Sunday, December 5, 2010

Filipino Beef Stew with Sweet Roasted Carrots

I apologize for not posting for a while. I know that no excuse is ever good enough, but I truly have not wanted to cook during this pregnancy…not because I don’t want to eat, but because nothing I make sounds appealing. It’s a terrible curse. But I found myself craving this beef dish one lazy Sunday so I decided to go for it.

My first roommate when I moved to Washington DC was Filipino. He made this dish for me one evening and I fell in love with it immediately. It’s a unique combination of both Spanish and Asian cuisine – YUM! What’s not to love about that? The beef is cooked for so long that it practically falls apart the second you bite into it, feeling like a slow cooked beef stew (that’s the Spanish influence), and the soy sauce mixture that it cooks in for 3 hours brings the Asian punch. It is one of the best beef dishes out there - hands down.

Now I know the name reads beef stew – but be aware that this cooks for so long that the liquid reduces down to almost nothing. When you’re making this, you should expect the liquid to just barely be covering the beef at the end – and know that your once cubed meat will likely have been torn to shreds. It’s delicious…

Time from Prep to Eating: 3 hours

What You Need:
Large stock pot or Dutch oven
1 sauce pan

The Stuff (Warning, this serves 4 hungry adults!):
4 lbs stew meat (beef), cubed
4 large yellow onions, chopped into quarters
5 large beef steak tomatoes, chopped into quarters
3 garlic cloves, crushed
½ cup low sodium soy sauce
1 cup water

Here’s What You Do:
Preheat your stock pot or Dutch oven over medium-low (more towards the lower side) heat for about 5 minutes. Then add all of the ingredients putting the meat in first. Raise the heat to medium until it comes to a hard boil – stirring occasionally until that happens. Once it comes to a boil, reduce to medium-low heat and let simmer for about 2.5 hours, stirring occasionally.

Serve with sticky rice (that’s what the sauce pan is for) and sweet roasted carrots (recipe below).

Sweet Roasted Carrots

Cooked carrots get a bad rap.  I think it's because we were all force fed mushy, tasteless carrots when we were kids and that memory has stuck with us into adulthood.  Such a shame.  These simple roasted carrots, however,  are delicious and NOTHING like what I remember from when I was little.  So before you pass up roasted carrots as an adult, give this recipe a try.

Time from Prep to Eating: 50 minutes

What You Need:
Cookie sheet

The Stuff (Warning, this serves 4 hungry adults!):
1 bushel of whole carrots, peeled and cut into pieces about 2 inches long
Canola oil
Salt and pepper
1 to 1.5 tsp sugar

Here’s What You Do:
Preheat your oven to 375 degrees. Line your cookie sheet with tin foil (for easy cleanup) and place your cut carrots onto the sheet. Drizzle the oil and sprinkle with salt and pepper and bake for 25 minutes. Take the carrots out, turn them with a spatula, sprinkle with the sugar and place them back in the oven for 5 more minutes at 400 degrees. Enjoy!

Monday, November 8, 2010

Asian Inspired Tilapia Fish Pockets

Prior to the days of me watching the Food Network I would have never thought of placing fish filets in parchment paper and making a fish pocket. After watching Rachel Ray do this to countless filets over the years, I’ve tried my hand at several of my own creations and loved every one of them. I’ve made fish pockets with various types of fish, fresh veggies and white wine (instead of the oil and soy sauce), and I’ve made pockets with just fish, salt, pepper and garlic. This Asian-inspired version is probably my favorite though. I am a HUGE fan of fresh ginger, so anything that requires it is a winner in my mind. Plus, the tender shitake mushrooms and cooked scallions add to the yummy Asian flavor.

If you’ve never tried making a fish pocket before, this recipe is definitely the one to try; tilapia is super mild, so the veggies keep their own flavor and also soak up the flavors of the oils, ginger, and soy sauce. As a bonus, it only takes 30 minutes to make. EASY!

By the way – I convinced my husband to try the shitakes at least once (he is an avid mushroom hater) and this was the first time I’ve ever seen him continue to eat the mushrooms!!! That is a huge victory for me…

Time from Prep to Eating: 30 minutes

What You Need:
Cookie sheet
2 large pieces of parchment paper, folded in half then cut into a heart shape

The Stuff:
2 tilapia filets
4 scallion, cut in half
Ginger root – you’ll need about a 2 inch piece – peeled and cut into 8 thin slices
1 package shitake mushrooms, sliced
4 slices of a lemon
Canola Oil
Soy Sauce
Sesame Oil (you don’t absolutely need this ingredient, but it’s a bonus if you do!!)
Salt
Pepper
Red pepper flakes

Here’s What You Do:
Preheat the oven to 375. Place the parchment paper on the cookie sheet and place one of the filets on one half of one of the paper cut outs. Then layer the rest of the ingredients as follows: 4 scallion halves, 4 slices of ginger, handful of shitake mushrooms, 2 slices of lemon, sprinkle of salt, pepper and red pepper flakes, then drizzle the top with the canola oil, soy sauce and sesame oil.

Once the filet and toppings are in place, place the other half of the paper over the fish and fold the edges all the way around, creating a pouch.

Place the closed pouches on the cookie sheet and bake in the oven for about 14 to 17 minutes.

Open the cooked pouches with care!!!!

Wednesday, November 3, 2010

Pumpkin Spice Cupcakes

Let’s establish some expectations here – I’m not a baker. I don’t bake. In fact, nothing will get me out of the kitchen faster than baking. I love baked goods though. No meal is ever complete without dessert and most of the time that includes baking something. My solution? Find others to bake for me! While that has worked for me for as long as I’ve been alive, I realize that no food blog would be complete without a baked good recipe. Below is my first attempt…a compromise…pre-packaged cake mix with my own twist.  Sandra Lee would be proud.

Fall is my favorite time of year. I love the crisp air, fall colors, pumpkin patches, apple cider, hot cocoa and all things that come with autumn. Spiced desserts are no exception. I LOVE anything pumpkin or spiced!! For this recipe I took major help from the store and decided to spice up some pre-made items. To do this, I took a box of cake mix and added/substituted some ingredients here and there to make them spicy, pumpkinny and a little bit all my own.

So while I know these are nowhere near Barefoot Contessa caliber, I am really proud of my pumpkin spice cupcakes. I think you’ll find that my baking method amplifies the standard vanilla cupcake box mix and makes them something you can call your own – and it was easier than making it from scratch! I’ll start working on real baking…

Time from Prep to Eating: 40 minutes

What You Need:
Cupcake baking pan
Mixer (stand or hand)

The Stuff for the Cupcakes:
1 box of vanilla cake mix
1 15oz can of pumpkin (you’re only going to use ½ of the can, so if your store carries 7.5oz cans, get that instead)
3 Tbsp unsweetened applesauce
¼ tsp cinnamon
¼ tsp ground ginger

Here’s What You Do:
Follow the instructions on the cake box, replacing the oil with the applesauce and pumpkin. For example, my cake box called for 1/3 cup canola oil. I substituted the oil with 3 Tbsp applesauce and 3 Tbsp pumpkin (this should equal 1/3 cup total). As the batter is mixing add in the cinnamon and ginger. Bake as directed, checking to see if they’re cooked through at the lowest end of the cooking time frame.

The Stuff for the Frosting:
1 tub of pre-made butter cream frosting
The remaining portion of the pumpkin (remember we’re only using half of the 15oz can for both the cupcake batter and frosting!)
¼ tsp cinnamon
1/8 tsp nutmeg

Here’s What You Do:
Transfer the frosting to a mixing bowl and add the remaining pumpkin, cinnamon and nutmeg, and fold in with a spatula until the frosting is light a fluffy.

Top the cooled cupcakes with the frosting and enjoy!

Sunday, October 17, 2010

Chicken and Bean Enchiladas

This recipe is a twist on a yummy Mexican classic – enchiladas! I’m not real sure how or why I came up with this one, but I’ve been making it for about 4 years now and still think they’re amazing. Now, I probably wouldn’t bring someone’s Hispanic grandmother over to try these out, but anyone who enjoys Mexican food and a little bit of culinary adventure are prime targets as guinea pigs.

My secret ingredient that makes people go “Hmmm….what is that….I like it!” is crushed pineapple. Crushed pineapple in chicken and bean enchiladas??? Yup! And it’s amazingly delicious too! I’ve made these for several friends and family members over the years and have yet to find someone who did not like the pineapple addition. Try it out and you’ll be pleasantly surprised, I promise.

For this recipe I use your basic rotisserie chicken from the store, but if you prefer to bake and shred your own chicken breasts feel free – I find my version to be less labor intensive. I also use chopped cilantro, which I know a lot of people strongly dislike. Cilantro is a bonus for those of us who like it, but it’s not a deal-breaker if you leave it out. Bon appetite!

Time from Prep to Eating: 50 minutes

What You Need:
Glass 9”x13” baking dish
Small or Medium skillet

The Stuff:
1 rotisserie chicken, skinned and shredded
2 cans black beans, drain only 1 can
½ medium white onion, chopped
28 oz and 15.5 oz can of your favorite enchilada sauce
15.5 oz can of crushed pineapple
8 oz bag of shredded Monterey Jack cheese
8, 10” burrito tortillas
Small handful of cilantro, chopped
1/8 tsp salt
1/8 tsp pepper
1/8 tsp cumin

Here’s What You Do:
Grease the baking dish with any non-stick cooking spray and pre-heat the oven to 375 degrees.

In the skillet heat the onions over medium heat (using a little olive oil) for about 2 to 3 minutes. Add the beans, salt, pepper and cumin and heat through for an additional 5 minutes.

Once the beans are cooked take your tortillas and layer the ingredients in the center of each tortilla. In the picture below I layered as follows 1) chicken, 2) beans, 3) spoon-full of pineapple, 4) pinch of cilantro, 5) large pinch of cheese, and 6) large spoon-full of enchilada sauce. Roll each tortilla with the filling and place side-by-side in the baking dish. Pour the remaining enchilada sauce over the top and sprinkle the remaining cheese. Bake in the oven for 40 minutes. Serve with a side of pineapple, sour cream and avocado.

Sunday, October 10, 2010

Humus

I love humus. I think it’s one of the most delicious dips on the planet. Fortunately, it’s also one of the easiest to make, cheapest to buy, and healthiest to eat as well! We should all do our part to eat more humus. Our hearts and tummies would thank us.

Now I know that I’m biased – this is after all my food blog – but I swear this is the best humus EVER. It’s got a garlicky kick so if you’re sensitive to garlic I recommend using only half of a small clove, and increase the lemon juice by ½ Tbsp to add more flavor.

If you need some ideas for how to serve humus, here are a few that I use:
-as a dip to any chip, cracker, or vegetable
-instead of mayonnaise on a sandwich, try humus instead
-bake some bread crostini’s, top with humus and roasted red pepper
-bake some bread crostini’s with melted mozzarella cheese, then dip in humus
-need a little dip or extra spice to your chicken at dinner? Dip it in some humus!

Time from Prep to Eating: 10 minutes

What You Need:
Food processor

The Stuff:
1 16 oz can of chickpeas or garbanzo beans, reserve ¼ cup liquid but drain the rest
4 tablespoons lemon juice
1 ½ tablespoons Tahini
1 medium to large clove garlic, crushed
¼ teaspoon salt
2 tablespoons olive oil
Pepper to taste
Drizzle with olive oil, paprika, parsley

Here’s What You Do:
Drain the chickpeas and set aside ¼ cup garbanzo liquid from can. Combine all ingredients in food processor and blend until desired texture…usually about 1-2 minutes on medium to high (I prefer my humus creamy without grit).

Before you serve, sprinkle with parsley, paprika, and finish with olive oil.

Monday, September 27, 2010

Shrimp and Grits

This is one of those southern dishes that are unforgettable and absolutely delicious. My love of shrimp and grits started during my stint in the Gulf Coast region in the years just prior to, and after, Hurricane Katrina. For those that don’t know my story, I spent over 2 years in the region doing hurricane relief from 2004-2006, and during this time I was fortunate enough to meet some of the most fabulous people and eat the most satisfying All-American cuisine. New Orleans, Biloxi, Hattiesburg, Mobile, and Pensacola – were all my stomping grounds at some point and these incredible cities offered me the food I seem to relate to the most. Shrimp and grits, fried chicken, black eyed peas, fried green tomatoes, collard greens and banana pudding are just a few of the dishes that still call to me.

In my years of being adventurous in the kitchen, I never attempted to make my own version of shrimp and grits. I was nervous that I could never do it justice and it would ruin my memories of a fabulous dish. For a foodie, this is our worst nightmare. I know that in order to make grits “the right way,” it requires spending 40-50 minutes in front of the stove stirring occasionally – a task that is hard for me to do after a long day’s work. So I never gave this dish a shot until now. I cheat by using quick cooking grits, but they are fabulous because of the butter and cheese that we add in at the last minute. I didn’t follow a recipe so that made this adventure extra fun; and I managed to get my husband in the kitchen to take part in my dinner fun. Southern cooking should never be a labor of one…

I hope that you enjoy my take on this down-home comfort food.

Time from Prep to Eating: 40 minutes

What You Need:
1 large sauté pan
1 medium sauce pan
1 cookie sheet

The Stuff:
½ lb. peeled and deveined raw shrimp
4 slices of hickory smoked bacon, cut into ½ inch strips
2 scallions, chopped
½ cup cheddar cheese, grated
¼ cup parmesan cheese, grated
¾ cup quick cooking grits
2 garlic cloves, 1 thinly sliced and the other finely diced
2 tomatoes sliced into ¼ inch pieces
Bread – slice the loaf into ½ inch pieces
1 Tbsp butter
Olive oil
Salt and pepper

Here’s What You Do:
Preheat the oven to 350 degrees. On the cookie sheet place the tomato slices in one single layer and top with the garlic slices, drizzle the olive oil on top and sprinkle with salt and pepper. Place in the oven for about 5 to 10 minutes.

In the meantime, sauté the bacon in the pan until crispy (about 4-5 minutes) over medium heat. Take the cooked bacon out of the pan with a slotted spoon and reserve for later use. Reduce the heat to med-low and add the diced garlic, cooking for about 1 minute and constantly stirring. Add the shrimp and cook for about 4 minutes. Towards the end of the cooking time, add in the scallions, bacon pieces and salt and pepper to taste.

At the same time you’re cooking the bacon and shrimp, cook the grits in the sauce pan following the instructions on the box. At the end of the cooking process add the cheese and butter until melted through, then salt and pepper to taste.

To serve, spoon the grits in a bowl then top with the shrimp, scallions and bacon. For your side dish, top the slices of bread with the roasted tomato and garlic.

Sunday, September 19, 2010

Fennel and Apple Salad

One of my favorite restaurants is Jaleo – a Spanish tapas joint with a couple locations in and around Washington, DC. Unlike a lot of other trendy tapas places this one serves more traditional Spanish dishes. This dish is what I look forward to the most; a delicious salad made of apples, fennel, walnuts, manchego cheese, and a wonderfully tart dressing. This salad will get anyone hooked. It’s an interesting combination of ingredients and yet so light and flavorful at the same time.

In another attempt to mimic my favorite restaurant dishes, I created this knock-off version to satisfy my cravings. My version has quite a few ingredient change outs, but tastes absolutely delicious. For all you home chefs out there, this method of mimicking your favorite dishes can be a great way to start cooking -- take something you love and try to recreate it by adding a personal touch here and there. You’d be surprised how good you feel when you’ve created something just as tasty, and even more fulfilled when others compliment your creation.

Time from Prep to Eating: 15 minutes

What You Need:
Salad bowls

The Stuff:
1 fennel, cut into strips
1 granny smith apple
3 green onions, thinly sliced
1 lemon, juiced
½ Tbsp rice wine vinegar
1 Tbsp olive oil
Pine nuts for garnish
Fennel fronds for garnish
Blue cheese crumbles for garnish
Pepper

Here’s What You Do:
I think one reason folks don’t cook with fennel is because they’re not sure 1) what it tastes like (a mild licorice flavor) or 2) how to prepare it. When eating it raw here’s how to cut it: first with your knife, cut the bottom bulb from the stalks. With the bulb, cut it into quarters lengthwise, trimming off the bottom edge (it’s a little tough) then removing the very inner part of the core (again, it’s a little tough). Then just slice the quarters into thin confetti shapes.

In a separate bowl, juice the lemon and add the vinegar and oil and whisk until well combined. To layer your salad, add the fennel, apple, and green onions. Sprinkle the pine nuts, blue cheese, and pepper to flavor and drizzle the dressing over the salad to the desired taste. I recommend adding a little of the dressing first, taste test to make sure you haven’t overpowered the salad ingredients, then add more dressing if needed.

Sunday, September 12, 2010

Potato Soup

This recipe brings me back to when I was a kid, I love this soup. It’s one of my comfort foods. My mom used to make this for us on occasion growing up and I remember being so excited when she would say to us kids “potato soup for dinner.” We all loved it. When I asked my Mom for the recipe for my blog, she told me it originally came from my Aunt Patti. So, I guess you could call this a true family recipe.

I think my favorite part of the soup is the creamy broth. It’s like clam chowder but without the clammy flavor. It’s so creamy and flavorful it will knock your socks off. I was explaining it to some friends the other day and they suggested frying bacon pieces and topping the soup like you would a baked potato; bacon, cheddar cheese, onions, tomatoes, etc. I imagine transforming this into a baked potato soup would be absolutely delicious.

This was the first time I made this dish in my own home. My husband tends to not like soups so I’ve been sparing him the torture of trying this one and watching him fake the, “It’s okay I guess.” I know I say this a lot – but he really LOVED this soup. When he took the first bite his eyes lit up and he proclaimed that it’s the only soup he actually likes…he then went back for a big heaping bowl of seconds! I hope you like it too.

Time from Prep to Eating: 1.5 hours


What You Need:
Stock Pot

The Stuff:
6 russet potatoes cut into ½ inch cubes (about 2 1/2 lbs)
2 medium onions, diced
2 carrots, thinly diced
2 celery ribs, thinly diced
2 small cans of corn, drained
2 (14 oz) cans low-sodium fat-free chicken broth
1 tsp dried basil
1 tsp salt
1/2 tsp pepper
1 bay leaf
Dash of cumin
1/4 cup flour
1 1/2 cups fat-free half and half
1 1/2 cups grated cheddar cheese
½ cup grated parmesan cheese

Here’s What You Do:
Combine the first 11 ingredients (potatoes to cumin) in a stock pot. Boil on med-high for 20 minutes, then reserve 1 cup of the potato, celery, onion and carrots (drained) in a separate bowl to add at the end of the cooking process. Reduce the heat to low.

In a separate bowl whisk together the flour and half-n-half and pour into the soup. Cover and cook another 40 minutes on low. Stir in the grated cheese until melted and add the reserved vegetables to heat through. Garnish with chives or onions.