Sunday, December 5, 2010

Filipino Beef Stew with Sweet Roasted Carrots

I apologize for not posting for a while. I know that no excuse is ever good enough, but I truly have not wanted to cook during this pregnancy…not because I don’t want to eat, but because nothing I make sounds appealing. It’s a terrible curse. But I found myself craving this beef dish one lazy Sunday so I decided to go for it.

My first roommate when I moved to Washington DC was Filipino. He made this dish for me one evening and I fell in love with it immediately. It’s a unique combination of both Spanish and Asian cuisine – YUM! What’s not to love about that? The beef is cooked for so long that it practically falls apart the second you bite into it, feeling like a slow cooked beef stew (that’s the Spanish influence), and the soy sauce mixture that it cooks in for 3 hours brings the Asian punch. It is one of the best beef dishes out there - hands down.

Now I know the name reads beef stew – but be aware that this cooks for so long that the liquid reduces down to almost nothing. When you’re making this, you should expect the liquid to just barely be covering the beef at the end – and know that your once cubed meat will likely have been torn to shreds. It’s delicious…

Time from Prep to Eating: 3 hours

What You Need:
Large stock pot or Dutch oven
1 sauce pan

The Stuff (Warning, this serves 4 hungry adults!):
4 lbs stew meat (beef), cubed
4 large yellow onions, chopped into quarters
5 large beef steak tomatoes, chopped into quarters
3 garlic cloves, crushed
½ cup low sodium soy sauce
1 cup water

Here’s What You Do:
Preheat your stock pot or Dutch oven over medium-low (more towards the lower side) heat for about 5 minutes. Then add all of the ingredients putting the meat in first. Raise the heat to medium until it comes to a hard boil – stirring occasionally until that happens. Once it comes to a boil, reduce to medium-low heat and let simmer for about 2.5 hours, stirring occasionally.

Serve with sticky rice (that’s what the sauce pan is for) and sweet roasted carrots (recipe below).

Sweet Roasted Carrots

Cooked carrots get a bad rap.  I think it's because we were all force fed mushy, tasteless carrots when we were kids and that memory has stuck with us into adulthood.  Such a shame.  These simple roasted carrots, however,  are delicious and NOTHING like what I remember from when I was little.  So before you pass up roasted carrots as an adult, give this recipe a try.

Time from Prep to Eating: 50 minutes

What You Need:
Cookie sheet

The Stuff (Warning, this serves 4 hungry adults!):
1 bushel of whole carrots, peeled and cut into pieces about 2 inches long
Canola oil
Salt and pepper
1 to 1.5 tsp sugar

Here’s What You Do:
Preheat your oven to 375 degrees. Line your cookie sheet with tin foil (for easy cleanup) and place your cut carrots onto the sheet. Drizzle the oil and sprinkle with salt and pepper and bake for 25 minutes. Take the carrots out, turn them with a spatula, sprinkle with the sugar and place them back in the oven for 5 more minutes at 400 degrees. Enjoy!

Monday, November 8, 2010

Asian Inspired Tilapia Fish Pockets

Prior to the days of me watching the Food Network I would have never thought of placing fish filets in parchment paper and making a fish pocket. After watching Rachel Ray do this to countless filets over the years, I’ve tried my hand at several of my own creations and loved every one of them. I’ve made fish pockets with various types of fish, fresh veggies and white wine (instead of the oil and soy sauce), and I’ve made pockets with just fish, salt, pepper and garlic. This Asian-inspired version is probably my favorite though. I am a HUGE fan of fresh ginger, so anything that requires it is a winner in my mind. Plus, the tender shitake mushrooms and cooked scallions add to the yummy Asian flavor.

If you’ve never tried making a fish pocket before, this recipe is definitely the one to try; tilapia is super mild, so the veggies keep their own flavor and also soak up the flavors of the oils, ginger, and soy sauce. As a bonus, it only takes 30 minutes to make. EASY!

By the way – I convinced my husband to try the shitakes at least once (he is an avid mushroom hater) and this was the first time I’ve ever seen him continue to eat the mushrooms!!! That is a huge victory for me…

Time from Prep to Eating: 30 minutes

What You Need:
Cookie sheet
2 large pieces of parchment paper, folded in half then cut into a heart shape

The Stuff:
2 tilapia filets
4 scallion, cut in half
Ginger root – you’ll need about a 2 inch piece – peeled and cut into 8 thin slices
1 package shitake mushrooms, sliced
4 slices of a lemon
Canola Oil
Soy Sauce
Sesame Oil (you don’t absolutely need this ingredient, but it’s a bonus if you do!!)
Salt
Pepper
Red pepper flakes

Here’s What You Do:
Preheat the oven to 375. Place the parchment paper on the cookie sheet and place one of the filets on one half of one of the paper cut outs. Then layer the rest of the ingredients as follows: 4 scallion halves, 4 slices of ginger, handful of shitake mushrooms, 2 slices of lemon, sprinkle of salt, pepper and red pepper flakes, then drizzle the top with the canola oil, soy sauce and sesame oil.

Once the filet and toppings are in place, place the other half of the paper over the fish and fold the edges all the way around, creating a pouch.

Place the closed pouches on the cookie sheet and bake in the oven for about 14 to 17 minutes.

Open the cooked pouches with care!!!!

Wednesday, November 3, 2010

Pumpkin Spice Cupcakes

Let’s establish some expectations here – I’m not a baker. I don’t bake. In fact, nothing will get me out of the kitchen faster than baking. I love baked goods though. No meal is ever complete without dessert and most of the time that includes baking something. My solution? Find others to bake for me! While that has worked for me for as long as I’ve been alive, I realize that no food blog would be complete without a baked good recipe. Below is my first attempt…a compromise…pre-packaged cake mix with my own twist.  Sandra Lee would be proud.

Fall is my favorite time of year. I love the crisp air, fall colors, pumpkin patches, apple cider, hot cocoa and all things that come with autumn. Spiced desserts are no exception. I LOVE anything pumpkin or spiced!! For this recipe I took major help from the store and decided to spice up some pre-made items. To do this, I took a box of cake mix and added/substituted some ingredients here and there to make them spicy, pumpkinny and a little bit all my own.

So while I know these are nowhere near Barefoot Contessa caliber, I am really proud of my pumpkin spice cupcakes. I think you’ll find that my baking method amplifies the standard vanilla cupcake box mix and makes them something you can call your own – and it was easier than making it from scratch! I’ll start working on real baking…

Time from Prep to Eating: 40 minutes

What You Need:
Cupcake baking pan
Mixer (stand or hand)

The Stuff for the Cupcakes:
1 box of vanilla cake mix
1 15oz can of pumpkin (you’re only going to use ½ of the can, so if your store carries 7.5oz cans, get that instead)
3 Tbsp unsweetened applesauce
¼ tsp cinnamon
¼ tsp ground ginger

Here’s What You Do:
Follow the instructions on the cake box, replacing the oil with the applesauce and pumpkin. For example, my cake box called for 1/3 cup canola oil. I substituted the oil with 3 Tbsp applesauce and 3 Tbsp pumpkin (this should equal 1/3 cup total). As the batter is mixing add in the cinnamon and ginger. Bake as directed, checking to see if they’re cooked through at the lowest end of the cooking time frame.

The Stuff for the Frosting:
1 tub of pre-made butter cream frosting
The remaining portion of the pumpkin (remember we’re only using half of the 15oz can for both the cupcake batter and frosting!)
¼ tsp cinnamon
1/8 tsp nutmeg

Here’s What You Do:
Transfer the frosting to a mixing bowl and add the remaining pumpkin, cinnamon and nutmeg, and fold in with a spatula until the frosting is light a fluffy.

Top the cooled cupcakes with the frosting and enjoy!

Sunday, October 17, 2010

Chicken and Bean Enchiladas

This recipe is a twist on a yummy Mexican classic – enchiladas! I’m not real sure how or why I came up with this one, but I’ve been making it for about 4 years now and still think they’re amazing. Now, I probably wouldn’t bring someone’s Hispanic grandmother over to try these out, but anyone who enjoys Mexican food and a little bit of culinary adventure are prime targets as guinea pigs.

My secret ingredient that makes people go “Hmmm….what is that….I like it!” is crushed pineapple. Crushed pineapple in chicken and bean enchiladas??? Yup! And it’s amazingly delicious too! I’ve made these for several friends and family members over the years and have yet to find someone who did not like the pineapple addition. Try it out and you’ll be pleasantly surprised, I promise.

For this recipe I use your basic rotisserie chicken from the store, but if you prefer to bake and shred your own chicken breasts feel free – I find my version to be less labor intensive. I also use chopped cilantro, which I know a lot of people strongly dislike. Cilantro is a bonus for those of us who like it, but it’s not a deal-breaker if you leave it out. Bon appetite!

Time from Prep to Eating: 50 minutes

What You Need:
Glass 9”x13” baking dish
Small or Medium skillet

The Stuff:
1 rotisserie chicken, skinned and shredded
2 cans black beans, drain only 1 can
½ medium white onion, chopped
28 oz and 15.5 oz can of your favorite enchilada sauce
15.5 oz can of crushed pineapple
8 oz bag of shredded Monterey Jack cheese
8, 10” burrito tortillas
Small handful of cilantro, chopped
1/8 tsp salt
1/8 tsp pepper
1/8 tsp cumin

Here’s What You Do:
Grease the baking dish with any non-stick cooking spray and pre-heat the oven to 375 degrees.

In the skillet heat the onions over medium heat (using a little olive oil) for about 2 to 3 minutes. Add the beans, salt, pepper and cumin and heat through for an additional 5 minutes.

Once the beans are cooked take your tortillas and layer the ingredients in the center of each tortilla. In the picture below I layered as follows 1) chicken, 2) beans, 3) spoon-full of pineapple, 4) pinch of cilantro, 5) large pinch of cheese, and 6) large spoon-full of enchilada sauce. Roll each tortilla with the filling and place side-by-side in the baking dish. Pour the remaining enchilada sauce over the top and sprinkle the remaining cheese. Bake in the oven for 40 minutes. Serve with a side of pineapple, sour cream and avocado.

Sunday, October 10, 2010

Humus

I love humus. I think it’s one of the most delicious dips on the planet. Fortunately, it’s also one of the easiest to make, cheapest to buy, and healthiest to eat as well! We should all do our part to eat more humus. Our hearts and tummies would thank us.

Now I know that I’m biased – this is after all my food blog – but I swear this is the best humus EVER. It’s got a garlicky kick so if you’re sensitive to garlic I recommend using only half of a small clove, and increase the lemon juice by ½ Tbsp to add more flavor.

If you need some ideas for how to serve humus, here are a few that I use:
-as a dip to any chip, cracker, or vegetable
-instead of mayonnaise on a sandwich, try humus instead
-bake some bread crostini’s, top with humus and roasted red pepper
-bake some bread crostini’s with melted mozzarella cheese, then dip in humus
-need a little dip or extra spice to your chicken at dinner? Dip it in some humus!

Time from Prep to Eating: 10 minutes

What You Need:
Food processor

The Stuff:
1 16 oz can of chickpeas or garbanzo beans, reserve ¼ cup liquid but drain the rest
4 tablespoons lemon juice
1 ½ tablespoons Tahini
1 medium to large clove garlic, crushed
¼ teaspoon salt
2 tablespoons olive oil
Pepper to taste
Drizzle with olive oil, paprika, parsley

Here’s What You Do:
Drain the chickpeas and set aside ¼ cup garbanzo liquid from can. Combine all ingredients in food processor and blend until desired texture…usually about 1-2 minutes on medium to high (I prefer my humus creamy without grit).

Before you serve, sprinkle with parsley, paprika, and finish with olive oil.

Monday, September 27, 2010

Shrimp and Grits

This is one of those southern dishes that are unforgettable and absolutely delicious. My love of shrimp and grits started during my stint in the Gulf Coast region in the years just prior to, and after, Hurricane Katrina. For those that don’t know my story, I spent over 2 years in the region doing hurricane relief from 2004-2006, and during this time I was fortunate enough to meet some of the most fabulous people and eat the most satisfying All-American cuisine. New Orleans, Biloxi, Hattiesburg, Mobile, and Pensacola – were all my stomping grounds at some point and these incredible cities offered me the food I seem to relate to the most. Shrimp and grits, fried chicken, black eyed peas, fried green tomatoes, collard greens and banana pudding are just a few of the dishes that still call to me.

In my years of being adventurous in the kitchen, I never attempted to make my own version of shrimp and grits. I was nervous that I could never do it justice and it would ruin my memories of a fabulous dish. For a foodie, this is our worst nightmare. I know that in order to make grits “the right way,” it requires spending 40-50 minutes in front of the stove stirring occasionally – a task that is hard for me to do after a long day’s work. So I never gave this dish a shot until now. I cheat by using quick cooking grits, but they are fabulous because of the butter and cheese that we add in at the last minute. I didn’t follow a recipe so that made this adventure extra fun; and I managed to get my husband in the kitchen to take part in my dinner fun. Southern cooking should never be a labor of one…

I hope that you enjoy my take on this down-home comfort food.

Time from Prep to Eating: 40 minutes

What You Need:
1 large sauté pan
1 medium sauce pan
1 cookie sheet

The Stuff:
½ lb. peeled and deveined raw shrimp
4 slices of hickory smoked bacon, cut into ½ inch strips
2 scallions, chopped
½ cup cheddar cheese, grated
¼ cup parmesan cheese, grated
¾ cup quick cooking grits
2 garlic cloves, 1 thinly sliced and the other finely diced
2 tomatoes sliced into ¼ inch pieces
Bread – slice the loaf into ½ inch pieces
1 Tbsp butter
Olive oil
Salt and pepper

Here’s What You Do:
Preheat the oven to 350 degrees. On the cookie sheet place the tomato slices in one single layer and top with the garlic slices, drizzle the olive oil on top and sprinkle with salt and pepper. Place in the oven for about 5 to 10 minutes.

In the meantime, sauté the bacon in the pan until crispy (about 4-5 minutes) over medium heat. Take the cooked bacon out of the pan with a slotted spoon and reserve for later use. Reduce the heat to med-low and add the diced garlic, cooking for about 1 minute and constantly stirring. Add the shrimp and cook for about 4 minutes. Towards the end of the cooking time, add in the scallions, bacon pieces and salt and pepper to taste.

At the same time you’re cooking the bacon and shrimp, cook the grits in the sauce pan following the instructions on the box. At the end of the cooking process add the cheese and butter until melted through, then salt and pepper to taste.

To serve, spoon the grits in a bowl then top with the shrimp, scallions and bacon. For your side dish, top the slices of bread with the roasted tomato and garlic.

Sunday, September 19, 2010

Fennel and Apple Salad

One of my favorite restaurants is Jaleo – a Spanish tapas joint with a couple locations in and around Washington, DC. Unlike a lot of other trendy tapas places this one serves more traditional Spanish dishes. This dish is what I look forward to the most; a delicious salad made of apples, fennel, walnuts, manchego cheese, and a wonderfully tart dressing. This salad will get anyone hooked. It’s an interesting combination of ingredients and yet so light and flavorful at the same time.

In another attempt to mimic my favorite restaurant dishes, I created this knock-off version to satisfy my cravings. My version has quite a few ingredient change outs, but tastes absolutely delicious. For all you home chefs out there, this method of mimicking your favorite dishes can be a great way to start cooking -- take something you love and try to recreate it by adding a personal touch here and there. You’d be surprised how good you feel when you’ve created something just as tasty, and even more fulfilled when others compliment your creation.

Time from Prep to Eating: 15 minutes

What You Need:
Salad bowls

The Stuff:
1 fennel, cut into strips
1 granny smith apple
3 green onions, thinly sliced
1 lemon, juiced
½ Tbsp rice wine vinegar
1 Tbsp olive oil
Pine nuts for garnish
Fennel fronds for garnish
Blue cheese crumbles for garnish
Pepper

Here’s What You Do:
I think one reason folks don’t cook with fennel is because they’re not sure 1) what it tastes like (a mild licorice flavor) or 2) how to prepare it. When eating it raw here’s how to cut it: first with your knife, cut the bottom bulb from the stalks. With the bulb, cut it into quarters lengthwise, trimming off the bottom edge (it’s a little tough) then removing the very inner part of the core (again, it’s a little tough). Then just slice the quarters into thin confetti shapes.

In a separate bowl, juice the lemon and add the vinegar and oil and whisk until well combined. To layer your salad, add the fennel, apple, and green onions. Sprinkle the pine nuts, blue cheese, and pepper to flavor and drizzle the dressing over the salad to the desired taste. I recommend adding a little of the dressing first, taste test to make sure you haven’t overpowered the salad ingredients, then add more dressing if needed.

Sunday, September 12, 2010

Potato Soup

This recipe brings me back to when I was a kid, I love this soup. It’s one of my comfort foods. My mom used to make this for us on occasion growing up and I remember being so excited when she would say to us kids “potato soup for dinner.” We all loved it. When I asked my Mom for the recipe for my blog, she told me it originally came from my Aunt Patti. So, I guess you could call this a true family recipe.

I think my favorite part of the soup is the creamy broth. It’s like clam chowder but without the clammy flavor. It’s so creamy and flavorful it will knock your socks off. I was explaining it to some friends the other day and they suggested frying bacon pieces and topping the soup like you would a baked potato; bacon, cheddar cheese, onions, tomatoes, etc. I imagine transforming this into a baked potato soup would be absolutely delicious.

This was the first time I made this dish in my own home. My husband tends to not like soups so I’ve been sparing him the torture of trying this one and watching him fake the, “It’s okay I guess.” I know I say this a lot – but he really LOVED this soup. When he took the first bite his eyes lit up and he proclaimed that it’s the only soup he actually likes…he then went back for a big heaping bowl of seconds! I hope you like it too.

Time from Prep to Eating: 1.5 hours


What You Need:
Stock Pot

The Stuff:
6 russet potatoes cut into ½ inch cubes (about 2 1/2 lbs)
2 medium onions, diced
2 carrots, thinly diced
2 celery ribs, thinly diced
2 small cans of corn, drained
2 (14 oz) cans low-sodium fat-free chicken broth
1 tsp dried basil
1 tsp salt
1/2 tsp pepper
1 bay leaf
Dash of cumin
1/4 cup flour
1 1/2 cups fat-free half and half
1 1/2 cups grated cheddar cheese
½ cup grated parmesan cheese

Here’s What You Do:
Combine the first 11 ingredients (potatoes to cumin) in a stock pot. Boil on med-high for 20 minutes, then reserve 1 cup of the potato, celery, onion and carrots (drained) in a separate bowl to add at the end of the cooking process. Reduce the heat to low.

In a separate bowl whisk together the flour and half-n-half and pour into the soup. Cover and cook another 40 minutes on low. Stir in the grated cheese until melted and add the reserved vegetables to heat through. Garnish with chives or onions.

Monday, September 6, 2010

Caprese Sandwiches with Roasted Red Pepper

I had a severe pregnancy craving the other day. I just HAD TO HAVE a caprese sandwich and I wouldn’t rest until I had one. It was pretty intense. What I craved was the fresh, crisp, cool, light, and flavorful combination of the veggies, bread and basil. I’m convinced it’s all about the bread and basil when it comes to making a good caprese sandwich. Both have to be good quality in order for these to really rock.

To spice it up a bit I roasted a red pepper and put a couple slices in each sandwich – awesome idea! What’s great about roasted peppers is that they’re not overpowering with flavor, but tend to complement foods such as cheeses and herbs. It was the perfect addition to this pregnancy-craving dinner.

My husband added hard Genoa salami to his sandwich and raved about it. If you’re the type that needs to have protein in each meal, try a little salami or even some prosciutto.

Time from Prep to Eating: 15 minutes


Makes 4 sandwiches.

What You Need:
Grill

The Stuff:
Fresh mozzarella, sliced into 8 - ¼ inch rounds
2 tomatoes, sliced into 8 - ¼ inch rounds
8 basil leaves
1 red pepper, roasted and skinned
Balsamic vinegar
Olive oil
Salt and Pepper
French baked bread, baked that day, cut into 8 - ½ inch slices

Here’s What You Do:
Drizzle oil on the red pepper and place on a grill over medium heat for 8 minutes, flipping once at 4 minutes. Place the grilled pepper in a bowl and cover with plastic wrap for five minutes. Once cooled, slice the pepper in half and take out the seed and tops. Turn the halves skin side out and peel off the charred skins and discard. Slice the pepper halves into four, creating a total of 8 pepper slices.

Slice the mozzarella, tomatoes and bread. Layer the following onto the bread: tomato, roasted pepper, basil, mozzarella. Drizzle with balsamic vinegar, olive oil, salt and pepper to taste.

Sunday, August 29, 2010

Blue Cheese Wedge Salad

There are people in this world who like blue cheese dressing and those that don’t. Then there are people like me: people that LOVE blue cheese dressing. Besides salads, I dip chicken wings and veggies in it, and have also been known to dab my pizza in blue cheese dressing as I take a bite. I know…I should probably seek counseling. While any blue cheese dressing will make me happy, I find that homemade dressings really do the trick. I’ve tried several recipes over the years - ones made with expensive imported cheeses from specialty stores and others made with the blue cheese crumbles found in every grocery store. To be honest, I find the dressings made with your run-of-the-mill blue cheese crumbles to taste the best, actually.

My favorite recipe of all was created by Ellie Krieger from the Food Network. This dressing is amazing and it’s sure to please any crowd – even you blue cheese lovers out there! It uses ingredients that are probably already in your kitchen and Ellie promises that it has fewer calories and fat than other blue cheese dressings. Something tells me that by eating half of the recipe below (it makes ¾ cups and 2 Tbsp is a serving!) completely destroys this theory, but somehow I feel better knowing I’m eating a dressing that’s a little better for me.

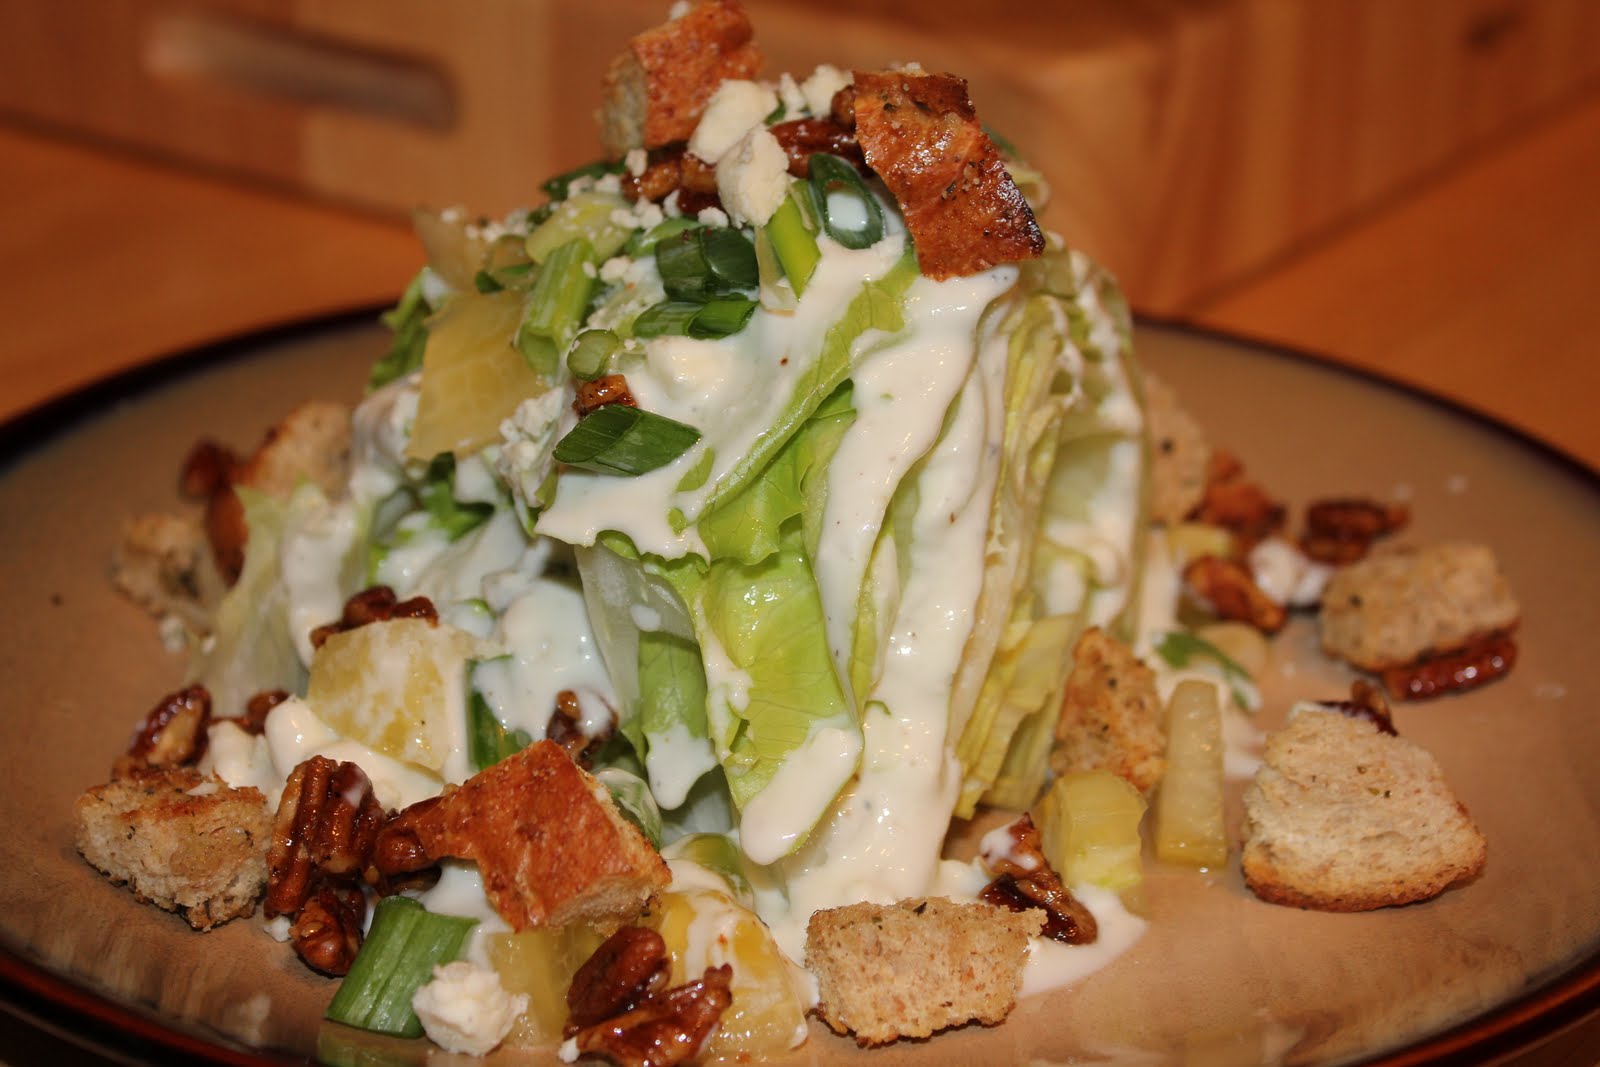
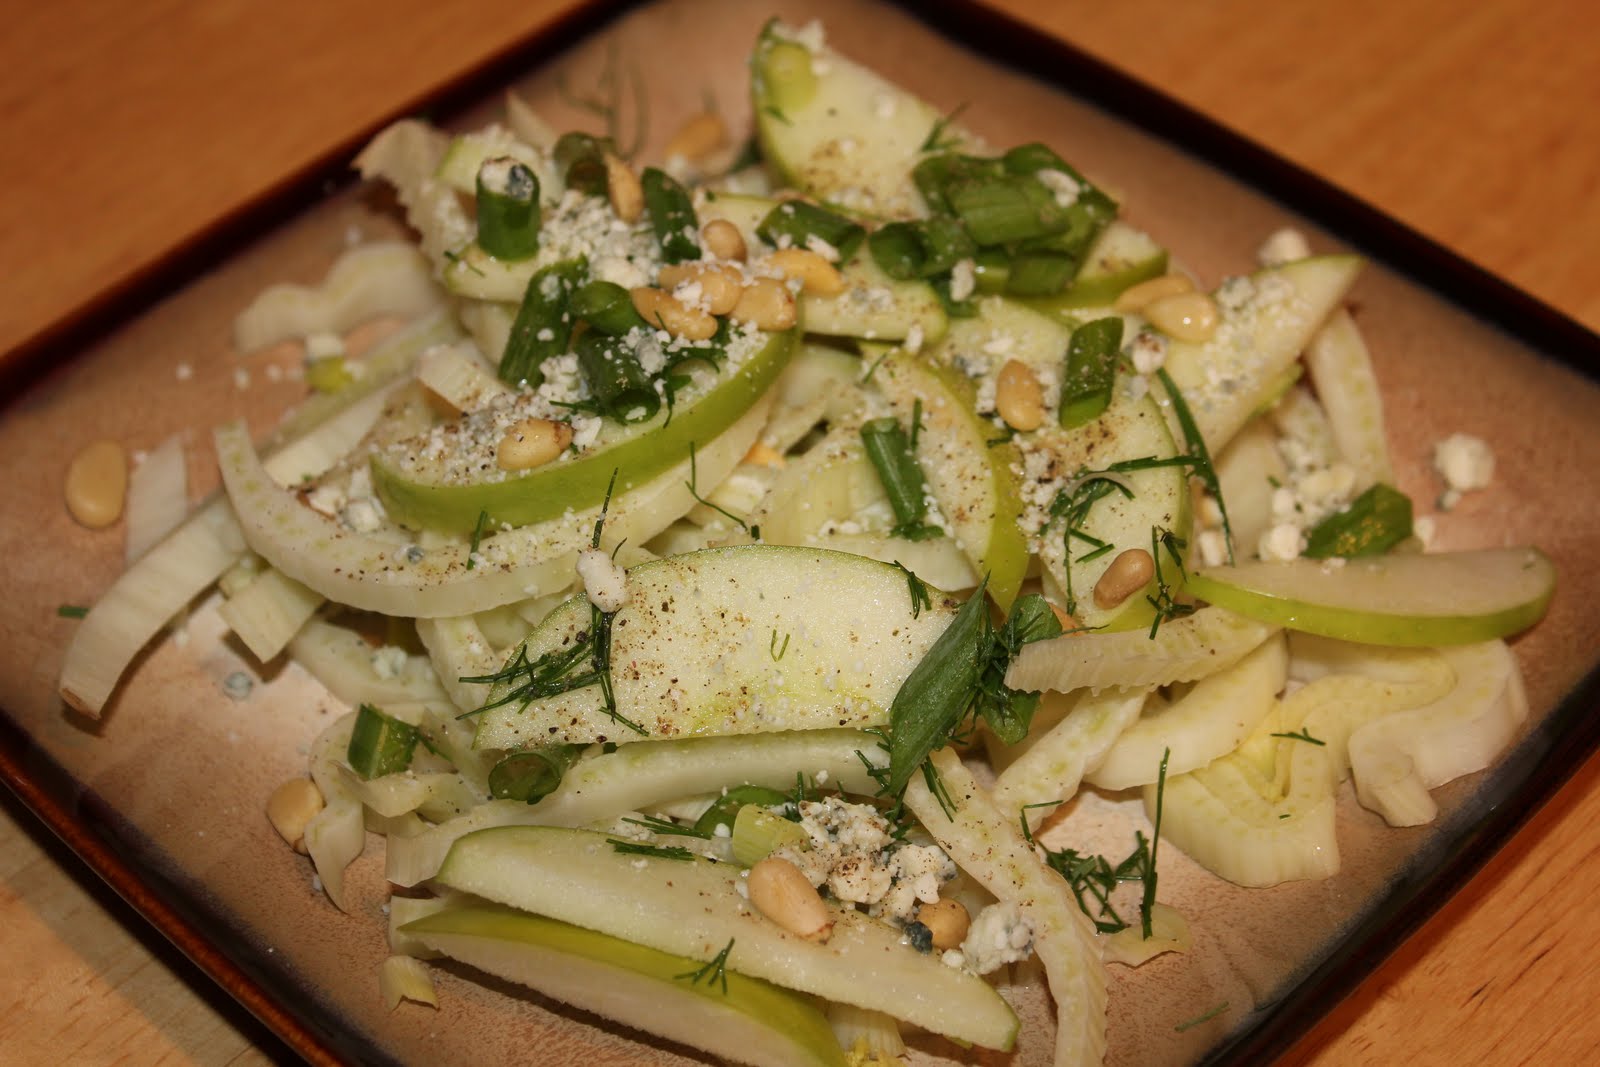
Aside from the dressing, this salad also has unique garlic breadcrumbs and spiced pecans. My family came to visit a couple months ago and I wanted to come up with a twist to the usual blue cheese wedge salad – these breadcrumbs and pecans are just that. They are the perfect complement to the dressing and are incredibly easy to make. While the dressing is Ellie’s, the breadcrumbs and pecans are my own.

For all you blue cheese lovers out there – Enjoy!

Time from prep to Eating: 20 minutes
 
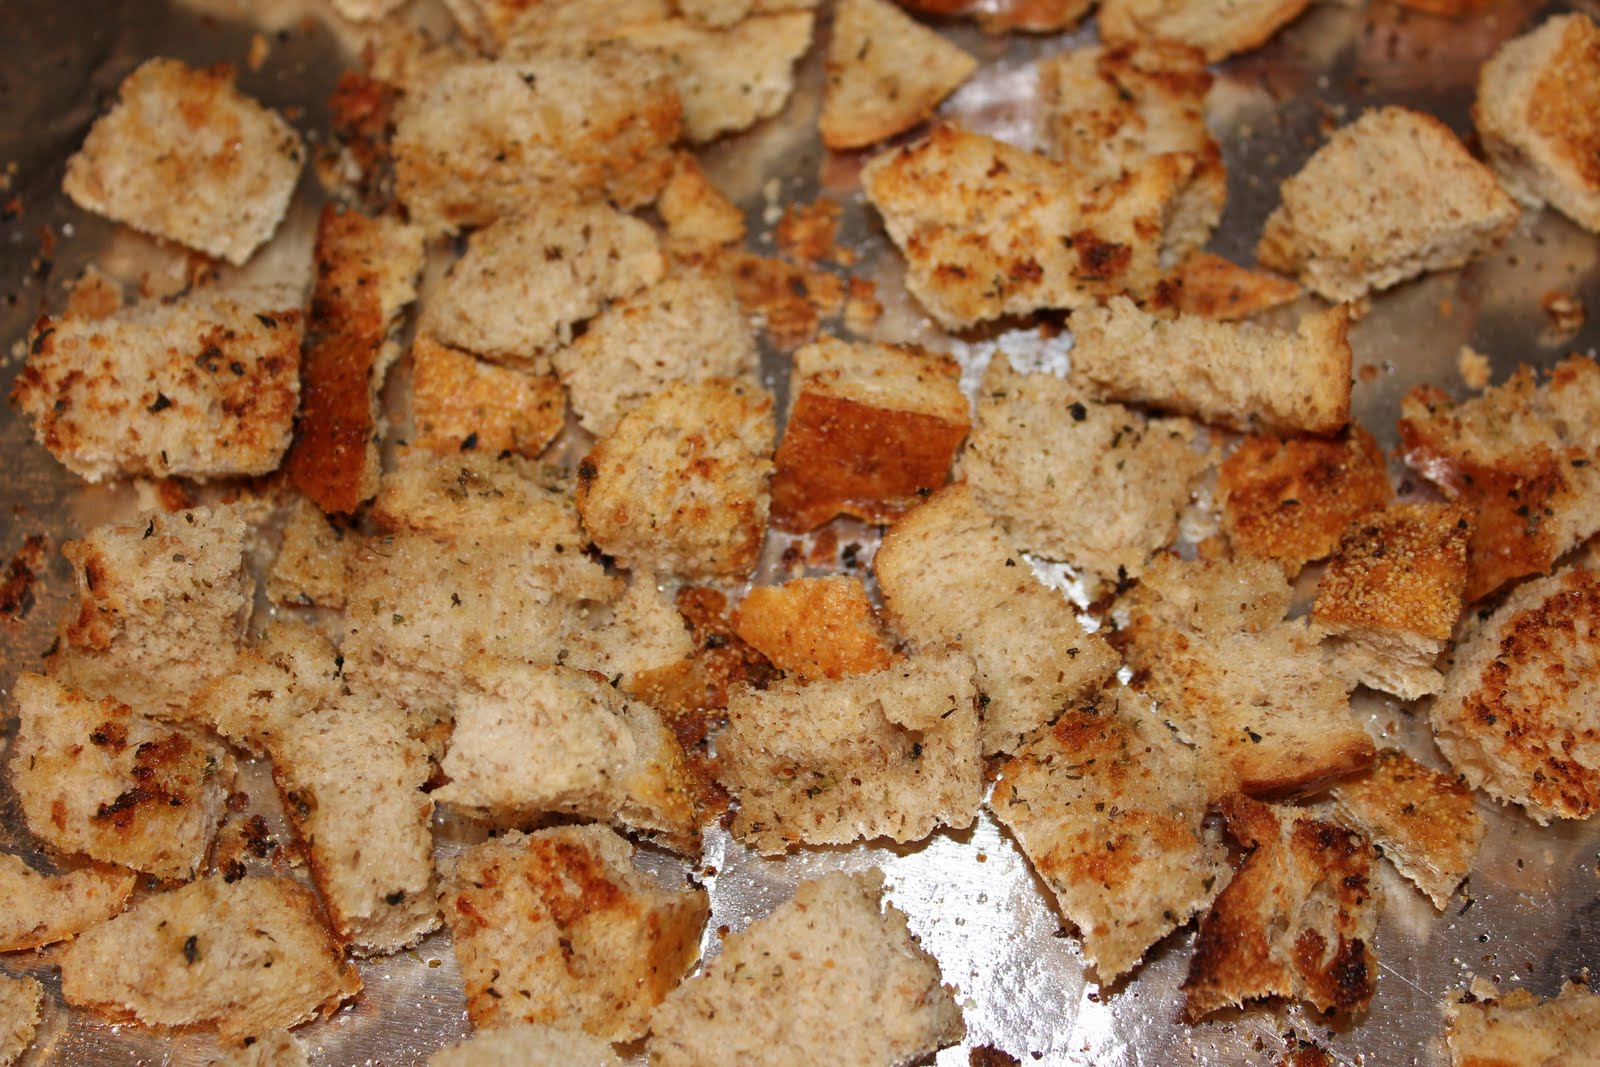
Homemade Bread Crumbs
 
What You Need:
Cookie sheet

The Stuff:
Cubed day-old bread (estimate about 2 slices of bread per person)
About 1 Tbsp olive oil
Salt
Pepper
Italian seasoning
Garlic powder

Here’s What You Do:
Preheat your oven to 350 degrees and place your bread cubes in one even layer on the cookie sheet. Drizzle the olive oil and sprinkle the bread with salt, pepper, Italian seasoning, and garlic powder until desired flavoring (if you’re unsure about how much to sprinkle, use a 2-fingered pinch for each spice and sprinkle evenly over the bread). Bake in the oven for 15 minutes, flipping the cubes over after 7 minutes to brown both sides.

As your bread is baking, start on the spiced pecans.
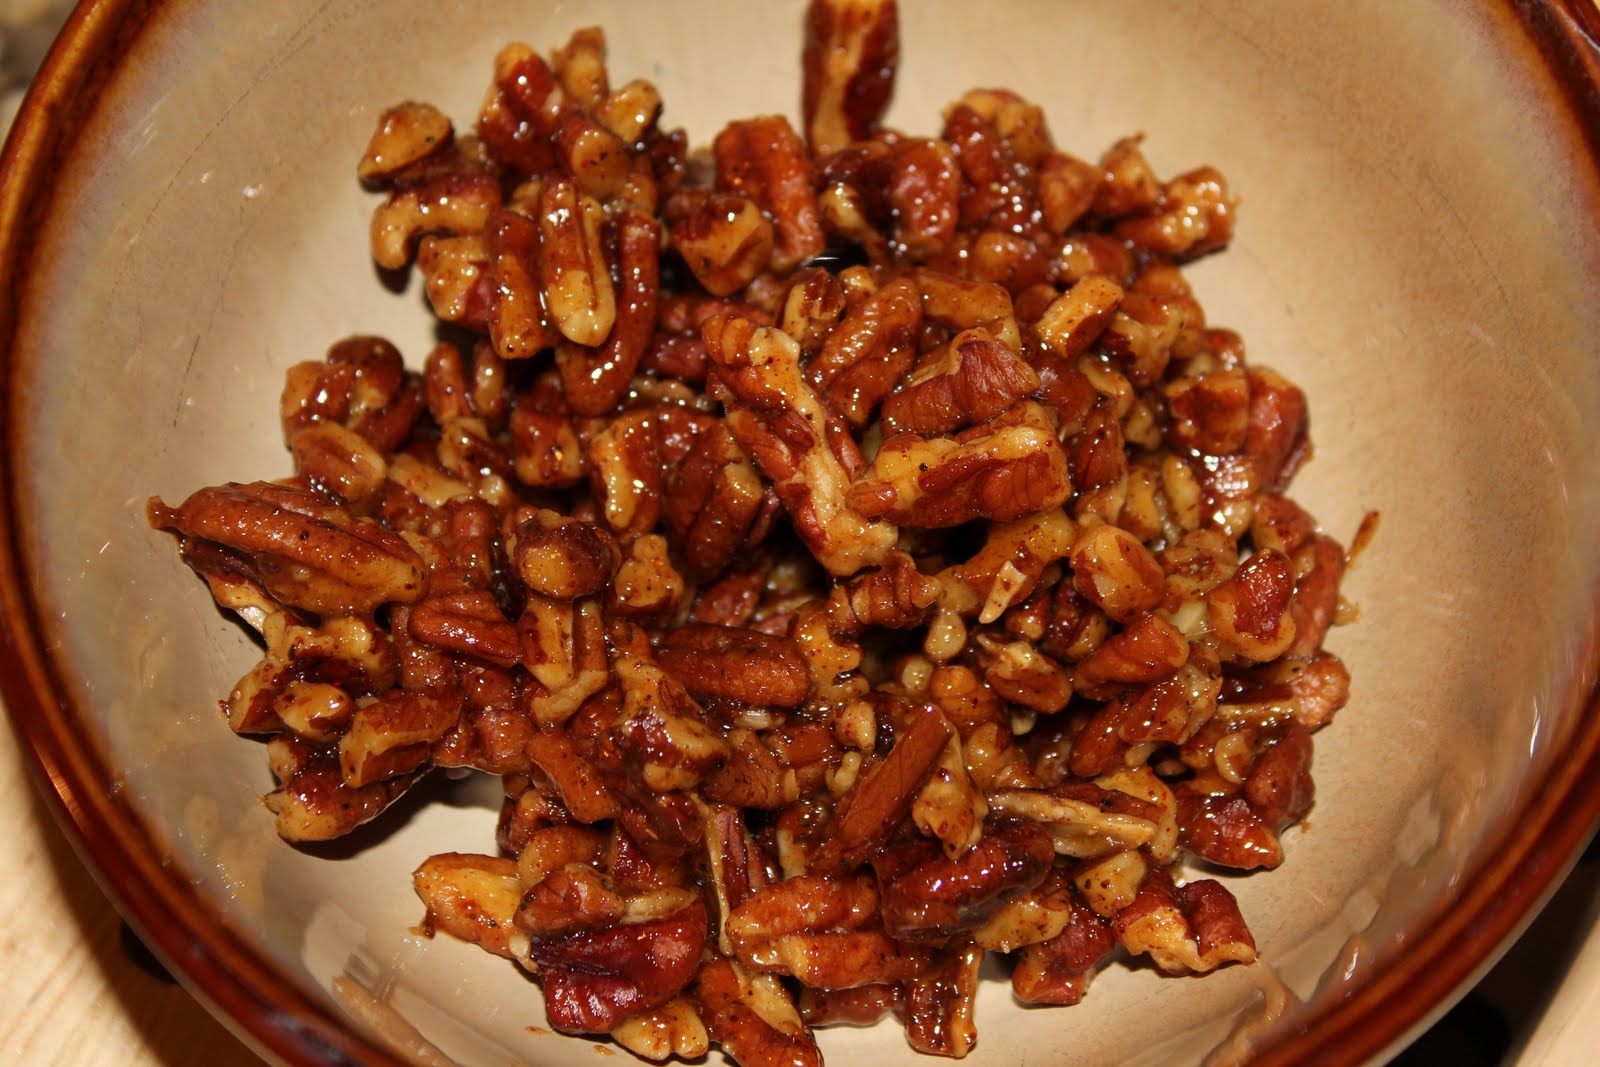
Spiced Pecans

What You Need:
Small skillet

The Stuff:
1 small package (2.25 oz) of chopped pecans
1 Tbsp butter
1 Tbsp brown sugar
1/4 tsp chili powder
1/8 tsp cumin
1/8 tsp garlic powder
1/8 tsp salt
1/8 tsp pepper

Here’s What You Do:
In the skillet melt the butter over medium heat then stir in the brown sugar until melted and slightly bubbly. Turn the heat to low then add the spices (chili powder to pepper), mixing until well combined with the butter and sugar. Add the pecans and cook for 5 minutes over low heat, stirring every minute or so to ensure the nuts don’t stick to the pan. Store in a cool bowl until you’re ready to top your salad.

Ellie’s Blue Cheese Dressing

2 tablespoons mayonnaise
1/4 cup low fat buttermilk
1/4 cup plain fat-free yogurt
1 tablespoon white vinegar
1/2 teaspoon sugar
1/3 cup crumbled blue cheese
Salt and freshly ground pepper

Fold a full sheet of paper towel into quarters and put it into a small bowl. Spoon the yogurt onto the paper towel and place in the refrigerator for 20 minutes to drain and thicken. In a medium bowl, whisk the buttermilk and thickened yogurt into the mayonnaise until smooth. Add the vinegar and sugar and continue to whisk until all the ingredients are well combined. Stir in the blue cheese and season, to taste, with salt and pepper.

The Salad

The Stuff:
1 tomato, sliced
3 green onions, chopped (or you can use a couple rounds of red onion too)
1 head of iceberg lettuce, cut into quarters
Spiced pecans
Breadcrumbs
Blue Cheese Dressing

Here’s What You Do:
Place a quarter of the iceberg in a bowl and drizzle the dressing. Top with the tomato, green onion, pecans, breadcrumbs and a few blue cheese crumbles.

Enjoy!

Monday, August 23, 2010

Extra Cheesy Mac and Cheese

It seems like everyone has a macaroni and cheese family recipe. While my family has unique recipes for a ton of different dishes, macaroni and cheese was left to Kraft (I love Kraft M&C so it's not a bad thing!). So in an effort to start my own tradition I came up with this version. To start, I thought of what makes me happiest when I eat macaroni and cheese – the cheese of course!  And this recipe sure does deliver when it comes to cheesy goodness - it's so yummy!  A little advice though, make sure the cheese is melted with the milk mixture before you put it in the oven.


Time from prep to Eating: 1 hour

What You Need:
Stock pot
Colander
9”x13” glass baking dish

The Stuff:
1 lb short noodle (i.e. bowtie, penne, etc.)
3 Tbsp butter
2.5 cups milk
¼ cup parmesan cheese
1 egg
¼ tsp salt
¼ tsp pepper
¼ tsp garlic powder
1 package or 8 oz. of Sargento reduced fat shredded Italian four cheese mix
1 lb shredded medium cheddar cheese
Bread crumbs
Italian seasoning

Here’s What You Do:
In your stock pot boil the noodles just shy of al dente (usually 7 minutes will do). In a separate bowl whisk the milk, salt, pepper, garlic powder, parmesan cheese and egg until well combined. Slowly add the milk mixture to the drained noodles, adding ½ of the cheese and all the butter until melted. Add the second half of the cheese, thoroughly mix until melted. Place the noodle mixture into the greased baking dish and lightly sprinkle the bread crumbs and Italian seasoning over the top. Bake in a 375 degree oven for about 45 minutes. Let stand 5 minutes and serve.

Sunday, August 15, 2010

Carrie’s Homemade Tomato Sauce

Happy Sunday my fellow home chefs!! I hope you’ve been cooking up a storm since last I posted.

To give you a little background on how I came up with this dish, I’ll take you back three months in the Sperz household. This is the first year my husband and I planted a garden in our backyard and I was so excited thinking of all the vegetables and herbs I would be able to cook with! Tomatoes, cucumbers, eggplants, lettuce, peppers, basil, cilantro, chives, parsley, mint…we were definitely ambitious with our little plot of land.

As any first-time gardener would do we thought we would kill at least ½ of the plants we purchased. So naturally we ended up planting way more than what we should have. For example, since I love tomatoes I thought we should get all kinds of varieties in the hopes that a few would actually survive.  Not only did we plant red ones, but we also included yellow, green and heirlooms as well – 7 plants in all. It sounded like a viable plan at the time…

Lucky for our investment, all of the plants survived. Well, except for the eggplant and cilantro, and three months later the seven tomato plants are producing WAY more tomatoes than any human being should ever eat in a growing season. So in an effort to pawn a few off we shared with friends, neighbors and coworkers and still had more than enough for our own use (mind you, Erik doesn’t eat tomatoes). I had to come up with a creative idea to use a lot of tomatoes - a fine chef challenge - and this tomato sauce does just that. It uses 15 medium to large tomatoes!!! Problem solved.

Now, I made a cook’s big no-no by serving this to guests the first time I made it. Shame on me! Luckily, it went over fantastically. Everyone loved it and could hardly believe I didn’t follow a recipe. Erik even went back for seconds and piled on the red sauce…WHAT?????? Success! I hope you love this as much as we did.

Time from prep to Eating: 2 hours 15 minutes

What You Need:
Cookie sheet
Large sauté pan

The Stuff:
13 to 15 medium to large tomatoes, halved
1 small onion, diced
1 large shallot, diced
3 cloves garlic, minced
½ cup chicken broth, low sodium (or you can use red wine if you prefer)
1 handful of spinach leaves
Olive oil
Salt
Pepper
Italian seasoning

Here’s What You Do:
Slice 13 to 15 medium to large tomatoes in half and place cut side up on a cookie sheet. Drizzle the olive oil, onion, shallot, garlic, salt, pepper and Italian seasoning on top. Roast in the oven for 2 hours at 325 degrees.

Allow the tomatoes to cool then remove the peels. In a sauté pan heat the tomato mixture over medium-high heat, using a wooden spoon to break them apart into smaller pieces. Add ½ cup chicken broth (or the red wine), spinach, and a pinch of salt and pepper. Simmer for 10 minutes.

The sauce pictured above was made from red, yellow, green and heirloom tomatoes.  Your sauce may be more "red" than mine if you use all red tomatoes.

Serve this sauce with any pasta.

White Pizza

For the same meal mentioned above, I must have needed a carb-fix. I felt I needed some pizza to wash down the pasta. Weird I know. But interestingly enough, the cheesy texture of this pizza complimented the pasta and red sauce perfectly. Of course, in your home you can (and probably should) make these dishes separately and feel just as carb-complete.


Time from prep to Eating: 30 minutes

What You Need:
2 small skillets

The Stuff:
1 pizza crust (i.e. Boboli)
2 Tbsp olive oil
3 cloves minced garlic
½ cup of your favorite alfredo sauce
½ cup part-skim ricotta cheese
8 oz mozzarella cheese
½ white onion, sliced into thin rings
Salt and pepper to taste
4 basil leaves
Finishing oil

Here’s What You Do:
Preheat the oven to 425, or as specified on the pizza crust directions.

In the small skillet, heat 1 Tbsp olive oil and the onion over medium heat for about 15 minutes until caramelized. You may need to add a pinch of white sugar to help it along – though this isn’t absolutely necessary. Once caramelized place the onions on a separate plate and lower the heat to low. Add the rest of the olive oil and the garlic slowly cooking for about 2 minutes.

On the pizza crust evenly spread the olive oil and garlic, followed by the alfredo sauce. Spoon the ricotta cheese in various areas around the pizza (don’t worry, the cheese will melt and spread out all by itself), then top with the mozzarella cheese. Evenly spread the onions over the top the cheese and sprinkle salt and pepper to taste.

Bake in the oven for about 15 minutes, or as directed in the pizza crust directions. Sprinkle with basil and some finishing oil before serving.

Friday, August 6, 2010

The Ultimate Baked Potato


Time from Prep to Eating: 15 minutes


This is probably one of my most favorite dishes that I make. Though I don’t think I’ve met a baked potato I didn’t like…the best part about it is that it’s super simple to make.

The inspiration for this recipe comes from a restaurant dish that I stumbled upon years ago. I went to college at Oregon State University where about 40 minutes away was a restaurant that had the best, most delicious, creative, and even addictive stuffed baked potato on their menu. This wasn’t just any stuffed baked potato. It was sliced in half and topped with loads of cheese, creamy alfredo sauce, a breast of chicken, and broccoli flowerettes. I loved this potato dish so much that I would find any excuse to drive the 40 minutes to get there. Mmmmm…the memories…

Much to my disappointment, BJs Restaurant and Brewery hasn’t found its way to Virginia yet (they’re in Ohio though!), so I came up with this knock-off version several years ago to satisfy my cravings. I promise you’re going to love this recipe. And if you get the chance to visit a BJs Restaurant and Brewery, their Grilled Chicken Potato will change your life. Just be sure to finish the meal with a chocolate chunk Pizookie Trio…I have yet to master a decent knock-off of this dessert...

What You Need:
A sauté pan

The Stuff:
2 russet potatoes
2 chicken breasts, cubed into bite size pieces
1 small head of broccoli, cut into flowerettes
1 cup of your favorite alfredo sauce
¼ cup of cheddar cheese, or even parmesan cheese (freshly grated only)
Salt, pepper, garlic powder for seasoning
Chives to top

Here’s What You Do:
There are two ways to bake a potato – one takes 5 minutes, the other an hour. For this recipe, I stick to the microwave method. Wash the potato, poke the potato with the tip of a knife in several location and place in the microwave for about 5 minutes, turning once at 2.5 minutes.

In the pan, cook the cubed chicken over medium-high heat until cooked through, about 7-10 minutes depending on the size of the cubes. During the last two minutes, add the broccoli flowerettes and cook until slightly softened. Sprinkle with salt, pepper and garlic powder to taste as it’s sautéing.

After the potatoes are cooked, place the alfredo in a microwave safe bowl and heat on high for about 1 minute – stirring at 20 to 30 second intervals.

For the assembly: Slice the potato in half and top with the cheese followed by the chicken, broccoli and then alfredo sauce. Sprinkle chives for color and a faint oniony flavor.

Sunday, July 25, 2010

Raving Lasagna

Everyone loves lasagna. Let’s face it, its layers of meaty, cheesy, noodley awesomeness all in one great dish. What we don’t love about lasagna is that it takes FOREVER to make and there’s a million steps in making it. I always felt daunted by the task of making lasagna for this very reason, but after watching Down Home with the Neely’s on the Food Network, I decided to borrow their wisdom in their method to shorten the cooking time. My own twist in this particular recipe comes from adding the turkey meat (recipe originally calls for hamburger meat), adding basil and dried parsley, taking out their seasoning salt, and of course I had to add in some vegetables (BTW – spinach is also a great idea in the recipe below). I’ve made this dish on a couple occasions for friends and family and everyone raves about it. I promise…you’ll love it too.


Time from prep to Eating: 1 hour 15 minutes

What You Need:
9”x13” deep baking dish
Large sauté pan
Stock pot
Large bowl

The Stuff
1 pound ground turkey
1 medium white onion, chopped
2 cloves garlic, minced
1 small zucchini
1 package of sliced mushrooms
1 (14.5-ounce) can stewed tomatoes, chopped
1 (8-ounce) jar tomato sauce
1 (6-ounce) can tomato paste
1 (8-ounce) box lasagna noodles, cook as directed
2 eggs
2 cups cottage cheese
1/2 cup grated Parmesan cheese
1 tsp dried parsley leaves
1 tsp salt
1 tsp black pepper
1 (8-ounce) bag shredded mozzarella
1 (8-ounce) bag shredded Cheddar
Small bunch of fresh basil and parsley, hand torn

Preheat the oven to 375 degrees and boil the lasagna noodles until just shy of al dente - they’ll continue to cook in the oven. In the large saute pan add the meat, onion and garlic until browned, breaking up the meat with a spoon. If needed, drain the pan of fat. Add the zucchini and mushrooms allowing them to cook for approximately 5 minutes, then add the stewed tomatoes, tomato sauce, and tomato paste. Cover and simmer for 15 minutes stirring occasionally.

In the large bowl whisk together the eggs, cottage cheese, Parmesan, parsley, salt, and pepper.

Spray the baking dish with any nonstick cooking spray. Spread one spoonful of the meat and veggie mixture into the bottom of the dish then layer half the noodles, overlapping by at least 1/2-inch. Spread half the cottage cheese mixture evenly on top and sprinkle half of the mozzarella and cheddar evenly. Pour half of the meat sauce on top. Repeat noodle, cottage cheese mixture, cheese, meat mixture layering. Bake in center of oven 35 minutes until bubbling around the edges. Let stand 10 minutes, sprinkle the basil and parsley just before serving.

Sunday, July 18, 2010

Mustard Encrusted Tilapia

In the mood for fish for dinner?  Let's count the many ways we could cook it - sear it, grill it, bag and steam it, roast it - been there, done that...bored of it all.  Just like the last posting, I again found myself bored with the same old recipes and cooking methods. To try and spice it up a bit I set out on a fish adventure and the recipe that follows is what came of this journey.

I actually got the inspiration for this dish from the show Barefoot Contessa on the Food Network.  Ina Garten uses slightly different ingredients, but I have a feeling my version would come in as a strong contender in a food battle.  Ina uses whole grain mustard as opposed to my spicy brown mustard, but when all I had was the latter, this recipe started to take on a life all its own. In addition to the mustard change out, I substituted mayonaise for her creme fraiche, and added dill, salt and pepper instead of shallots and capers (Erik dislikes capers). After all that, what started off as another copy cat drill ended up becoming a creation all my own!

Now I know that mustard encrusted fish - or mustard encrusted anything for that matter - just sounds downright weird; but it’s the quick broil at the end of the cooking process that makes the topping fabulously crunchy with a delicious hint of dill.  Even for mustard haters (Erik is one of them too, do we see a trend here?), this dish does NOT scream mustard in your mouth...it's so mild and compliments the texture of a fish filet perfectly. Erik loves this dish!  I dare you to try it.

I recommend serving this dish with ginger infused jasmine rice and steamed edamame. You could also substitute the tilapia with mahi mahi...or any other mild white fish that's on sale that day (Ina used Red Snapper).

Time from Prep to Eating: 15 minutes

What You Need:
A small mixing bowl, 8”x8” baking dish

The Stuff:
2 Tilapia filets
3 Tbsp mayonnaise
1 ¼ Tbsp spicy brown mustard
1/8 tsp salt
1/8 tsp pepper
1/4 tsp dried dill
Unseasoned bread crumbs (or panko)

Here’s What You Do:
Pre-heat the oven to 400 degrees.

Mix the mayonnaise, mustard, salt, pepper and dill in the mixing bowl until well combined. Spray your baking dish with nonstick spray and place filets in the dish. Spread the sauce evenly on each filet, and then sprinkle with bread crumbs to coat.

Bake in the oven for 10 minutes, then broil for 3 minutes.

Friday, July 9, 2010

To My Closet Followers

So a little birdie has informed me that the extent of my readership spans beyond my devoted 14 followers. *smile*

This same little birdie has brought to my attention that these aforementioned “secret readers” – dare I call you closet followers – respectfully request that I post more recipes and add a little more content to each posting.

You’re hooked on cooking now, aren’t you? Muahahahahaha… muahahahaha!

I know. It’s okay. You can admit it. You’ve been inspired to be a home chef too!

In all honesty, I’m thrilled to get feedback on the blog. I took a break thinking no one really stopped by, but now I’m motivated to get back on this thing and post some of my new dishes. Yes, I have been cooking while I was away.

I take to heart that I should make the blog posts more personal and that I should add more content. However, I want to meet you in the middle and keep this blog focused on the thing I love most: the food (besides my husband, of course). So from here on out, I promise to be more consistent with the postings, include a story or two about recipes/dishes, and even extend the blog to include some of the FABulous recipes I have found from my favorite cookbooks and Food Network shows (don’t worry, I will give proper credit where due). Sound good?

So what’s coming up next on “Chef Carrie?” Well, I’ve been saving a few good ones to share. We’ll start off with a good ole American casserole. GASP! I NEVER do American cuisine! I never do casseroles. DOUBLE GASP!!!! Then we’ll venture to Italy for my famous lasagna (it actually is famous, people!!!), and I’ll work on an idea I have for a mustard encrusted tilapia (don’t be scared).

All joking aside, it makes me happy to know I have more readers than I thought, and for that I’ll keep cooking and sharing. Bon appétit and happy cooking!

P.S. Oh, and please keep the comments and suggestions coming…even if they do come through a little birdie.

Carrie’s GASP! Cheesy Chicken and Broccoli Casserole

Time from Prep to Eating: 1 hour and 15 minutes

I know what you’re thinking. A casserole? With broccoli? Come on, Carrie, where’s the recipes of the world? I live in America. Home of the icky casseroles that are a hodgepodge of unknown ingredients baked in the oven for hours.

Before you judge, you should at least try. That is my motto when it comes to food.

Actually, this recipe is remarkably tasty and a good way to use up some spare ingredients you may already have in the house. In fact, that’s how I came up with this one. I had a small head of broccoli, two chicken breasts and an onion in the fridge without any idea of what to do with them. On my lazy nights I’ve been known to just pan sear spiced cubed chicken with broccoli and onion, serve it on a bed of rice or rigatoni and call it a day. But to be honest, sometimes the same ole gets ole! So I came up with this casserole idea to try and jazz up the mundane and to my surprise, it turned out fabulous…even for my worldly taste buds. Enjoy!

What You Need:
2 ½ quart deep baking dish (i.e. Corningware)
Medium sauce pan
Whisk

The Stuff:
¾ pound of cooked pasta, recommended spiral, bowtie, or rigatoni
2 boneless skinless chicken breasts, cut into 1 inch cubes
1 small to medium head of broccoli, cut off all the flowerettes
1 small yellow onion, thick chop
3 cups milk
2 cups shredded cheddar cheese
2 ½ Tbsp flour
2 Tbsp butter
Salt, pepper, nutmeg to taste
Breadcrumbs

Here’s What You Do:
Pre-heat the oven to 400 degrees. In the meantime cook the pasta as indicated on the box and drain.

In the sauce pan melt the butter over medium-high heat. Whisk in one Tbsp flour stirring until well combined (about 1 minute). Add the rest of the flour, whisking the entire mixture for about 1 minute until the flour is cooked slightly. Slowly pour in the milk whisking the mixture continuously to break up any clumps that might appear. Continue to whisk for about 2-3 minutes until well combined and thickened. Stir in 1 cup of cheese until melted, followed by the rest of the cheese stirring until melted. Add the salt, pepper and nutmeg to taste. Congratulations, you just made a rue!

In the baking dish evenly mix the chicken, broccoli flowerettes, onion, and pasta, and pour the rue over the mixture, topping with breadcrumbs. Bake in the oven for 50 minutes.

Tuesday, June 15, 2010

Sautéed Shrimp and Vegetables with Pesto Pasta

Time from Prep to Eating: 30 minutes

For the Pesto
What You Need:
Food processor

The Stuff:
1 cup basil leaves, packed
1 cup parsley leaves, packed
1/8 cup pine nuts
1/8 cup walnuts
2 garlic cloves
½ cup freshly grated parmesan
1/8 tsp pepper
¼ tsp salt
½ cup extra virgin olive oil

Here’s What You Do:
Put all ingredients (except the olive oil) into a food processor and pulse, drizzling the oil until well combined.

For the Shrimp and Vegetables

The Stuff:
½ zucchini, julienne
½ red pepper, julienne
12 shrimp (approximately 6 per person)
Zest of 1 lemon
½ pound of spaghetti pasta (cook as directed)

Here’s What You Do:
Sautee the vegetables and shrimp over med-high heat for approximately 4-5 minutes. As it is cooking, add the lemon zest and ½ of the pesto. Once the shrimp is cooked through add in the pasta and the remaining pesto. Toss to coat.

Sunday, June 6, 2010

Grilled Steak with Yogurt and Garlic Marinade with Tabouli Salad and Cucumber Yogurt Sauce

So what do you do when you have two overgrown parsley and mint plants? Take a trip to the Middle East of course!  Enjoy!


Time from Prep to Eating: 30 minutes

What You Need:
Container for marinade

The Stuff:
1 lb. flank steak
1 6oz plain yogurt
1 large garlic clove, pressed
¾ tsp dried oregano
1/8 tsp salt and pepper
Zest of 1 lemon
Pinch of red pepper

Here’s What You Do:
Mix together all of the ingredients (except the steak) in a large marinade container. After well combined, add the steak and flip to coat thoroughly. Allow to marinade in the refrigerator for at least 4 hours. Take out of the fridge at least 15 minutes before grilling.

For medium rare, grill on high for 4 minutes per side.

Tabouli Salad with Toasted Pita Bread

Time from Prep to Eating: 15 minutes

What You Need:
Large bowl for mixing
1 cookie sheet lined with tin foil

The Stuff:
½ cup bulgar wheat (cook as directed on box)
½ cucumber, thinly diced
1 large vine tomato, thinly diced
¼ white onion, thinly diced
1 small garlic clove, pressed
Zest of 1 lemon
Juice of ½ lemon
3 cups packed parsley, chopped
¼ tsp pepper
2 tbsp extra virgin olive oil
4 pita pockets
Sprinkle cumin and chili powder

Here’s What You Do:
Pre-heat oven to 350 degrees. Lay the pita pockets on the foil lined cookie sheets and lightly coat the pita with extra virgin olive oil and sprinkle of cumin, chili powder, salt and pepper. Bake in the oven for approximately 10 minutes.

In the meantime, mix together all of the ingredients (from the bulgar to the extra virgin olive oil) in a large mixing bowl.

Serve the tabouli salad with the toasted pita.

Cucumber Yogurt Sauce

Time from Prep to Eating: 5 minutes

What You Need:
Small bowl for mixing

The Stuff:
1 6 oz plain yogurt
5 large mint leaves, thinly sliced
1 small garlic clove, pressed
Juice and zest of half a lemon
1/8 tsp salt and pepper
Pinch of red pepper flakes
½ Tbsp extra virgin olive oil
½ cucumber, sliced

Here’s What You Do:
Mix all ingredients in a small mixing bowl and serve with tabouli and pita.

Tuesday, May 18, 2010

Macadamia Nut Encrusted Tilapia with Mango Grapefruit Salsa and Coconut Rice

This meal is sure to take you on a dinner trip to the South Pacific. It’s wonderfully light and fresh with a hint of citrus.


Time from Prep to Eating: 30 minutes

What You Need:
8”x8” baking dish
1 small bowl
1 plate

The Stuff:
2 Tilapia filets
¼ cup chopped macadamia nuts
¼ cup Panko breadcrumbs
1 egg, whisked
Salt and pepper to taste

Here’s What You Do:
Grease the baking dish with any non-stick cooking spray and pre-heat the oven to 450 degrees.

In a separate bowl whisk one egg. On the plate mix the macadamia nuts, Panko breadcrumbs and salt and pepper.

Take each filet and dip it in the egg mixture, then dip it in the nuts and breadcrumbs. Ensure both sides of the filets are covered with the mixture and place in the baking dish. Pour the rest of the mixture over the filets and bake in the oven for 15 minutes.

Squeeze the left over lime and lemon from the salsa before serving.  Serve with the salsa and rice (recipes below).

Mango and Grapefruit Salsa

Time from Prep to Eating: 10 minutes


What You Need:
1 large mixing bowl

The Stuff:
1 Mango, diced
½ Grapefruit, peeled and diced
1 Avocado, diced
2 scallions, sliced
½ red pepper, diced
½ lemon
½ lime
1 Tbsp Canola Oil
Pinch of red pepper flakes
Pinch of cumin
Pinch of garlic powder
Salt and pepper to taste

Here’s What You Do:
Dice all ingredients to roughly the same size and mix in a large mixing bowl. Allow to set for at least 5 minutes before serving.

Coconut Rice

Time from Prep to Eating: 10 minutes


What You Need:
Medium pot
Small skillet

The Stuff:
1 cup jasmine rice
Coconut water
¼ cup coconut flakes
Salt and pepper to taste

Here’s What You Do:
Follow the cooking instructions for the jasmine rice and substitute the water for coconut water.

In a separate skillet heat the coconut flakes over medium heat until brown and crispy (about 5 minutes).

Top the rice with the coconut flakes and salt and pepper to taste.

Tuesday, May 4, 2010

Stuffed Poblano Peppers

Time from Prep to Eating: 45 minutes


What You Need:
9”x12” baking dish
Medium mixing bowl

The Stuff:
6 medium to large poblano peppers
1 - 14.5oz can black beans, drained
1 - 14.5oz can corn kernels
1 - 14.5oz diced tomatoes, diced
1 - 4oz can fire roasted diced green chiles, drained
½ cup bulgur wheat
½ package of frozen spinach, thawed
¼ tsp salt
1/8 tsp pepper
1/8 tsp cumin
1/8 tsp chili powder
½ cup shredded Mexican cheese mix

Here’s What You Do:
Pre-heat the oven to 400 degrees and grease the baking dish with non-stick cooking spray.

ut off the top of the poblano peppers and discard the seeds. Mix the remaining ingredients (except for the cheese and half of the diced tomatoes) in the large mixing bowl until well combined then stuff the peppers with the mixture. Place the peppers in the baking dish then pour the remaining diced tomatoes on top of the peppers. Roast in the oven for 30 minutes.

Top the peppers with the cheese and broil for about 3 minutes.

Tuesday, April 27, 2010

Bacon and Lemon Roasted Brussel Sprouts

I recently found out that most people say they don't like brussel sprouts even though they haven't tried them!  I think it's because we grow up hearing how terrible other people think they are and don't care enough to form an honest opinion of our own. Well, I set out on a mission to see how I could make brussel sprouts pallatable...and I surprised even myself.  I'm willing to bet this recipe would change anyone's opinion of the itty bitty cabbages. Plus...everything is better with a little bacon.


Time from Prep to Eating: 25 minutes

What You Need:
Cookie sheet lined with tin foil

The Stuff:
1 package of brussel sprouts, peel off the top layer then slice in half
Zest and juice of one lemon
5 bacon strips, pre-cooked then crumbled
2 Tbsp extra virgin olive oil
Salt and pepper to taste

Here’s What You Do:
Pre-heat the oven to 400 degrees.

Place the brussel sprouts on the pan in one even layer then add the zest, oil, and salt and pepper. Roast in the oven for 15 minutes, then toss with lemon juice and bacon bits.

Cauliflower Gratin

Cauliflower is another vegetable that gets a bad rap.  One that I admit I even disliked up until recently.  After trying this recipe my opinion is changed.  I promise that even your kids will love this cauliflower side dish! 

Time from Prep to Eating: 35 minutes

What You Need:
1.5 quart baking dish

The Stuff:
1 medium cauliflower head, cut into bite sized florets
2 Tbsp butter
2 Tbsp flour
2 cups milk
Fresh ground nutmeg
Salt and pepper to taste
½ cup grated parmesan
Unseasoned bread crumbs or panko

Here’s What You Do:
Pre-heat the oven to 400 degrees.

In a medium sauce pan melt the butter over medium-high heat. Whisk in one Tbsp flour stirring until well combined. Add second Tbsp of flour, whisking entire mixture for about 2 minutes until the flour is cooked slightly. Slowly pour in the milk whisking the mixture continuously to break up any clumps that might appear and come to a simmer. Continue to whisk for about 3-4 minutes until well combined and thickened then add in the salt, pepper and nutmeg. You’ve just made a “rue!”

Fill the baking dish three-quarters full with the cauliflower. Pour the rue over the cauliflower then top with the parmesan cheese and bread crumbs. Bake in the oven for 25-30 minutes.

Tuesday, April 20, 2010

Zesty Lime Steak Tacos with my Famous Pico de Gallo

These authentic-style Mexican steak tacos are incredibly delicious; with a unique zesty lime and cilantro marinade. Topped with my famous pico de gallo and these just might be the best tacos you’ve ever tasted.

Time from Prep to Eating: 35 minutes

What You Need:
A grill

The Stuff:
¼ cup lime juice (fresh or concentrate)
3 Tbsp extra virgin olive oil
½ cup chopped cilantro
1/8 tsp pepper
Zest of 1 lime
Your favorite grill seasoning (try McCormick and Schmick’s Steak Grill Seasoning)
6” soft corn tortillas
2 lbs top sirloin steak
1 head of red cabbage, shredded
Sour cream

Here’s What You Do:
For the marinade, mix together the first five ingredients (lime juice to the zest) in a small mixing bowl, place sirloin in a zip lock bag and pour the marinade over the meat. Allow meat to set in the refrigerator for at least 30 minutes, but no longer than one hour.

Turn your grill to med-high heat. Take the meat out of the refrigerator for at least 15 minutes before placing on the grill and sprinkle grill seasoning on both sides. In the meantime, start on the pico de gallo (recipe below).

Once the meat has come to room temperature, grill for 5 minutes on the first side then flip and grill for an additional 4 minutes. Remove and allow to rest for at least 5-10 minutes before you slice (against the grain), in thin strips. Allowing them to rest is critical! No matter how hungry you are…let the meat rest!

Warm the tortillas on the grill for about 30 seconds (turning once). Assemble your tacos, topping with red cabbage, sour cream, and the pico de gallo.

Carrie’s Famous Pico de Gallo

Alright, alright…here it is. This is my famous pico de gallo…which people swear has changed their life forever. Enjoy!

Time from Prep to Eating: 35 minutes

What You Need:
A medium mixing bowl

The Stuff:
3 scallions, minced
1 vine ripe tomato, diced
2 avocados, pitted and diced to bite size pieces
1 Tbsp cilantro, rough chop
Juice of 1 lime (if it’s not REALLY REALLY juicy, go with two)
¼ tsp cumin
¼ tsp garlic powder
¼ tsp salt
¼ tsp pepper

Here’s What You Do:
Combine all ingredients in a mixing bowl and stir thoroughly to coat the avocado in the lime juice. You can serve this immediately, but it’s best after about 30 minutes in the refrigerator (stirring occasionally). It’s good on chips, quesadillas, tacos, burritos, you name it.

Thursday, April 15, 2010

Eggplant Parmesan a la Carrie

Wow! Eggplant Parmesan just went from a dish I reluctantly choose once in a while when I’m dragged to an Italian restaurant, to probably the best Italian dish I’ve ever had…and I made it myself! This is NOT your typical eggplant parmesan and that’s exactly what I love about it; rustic, not time consuming to make, and packed with flavor. No pan frying, no egg-wash and no 1.5” disks of eggplant slopped on your plate in the end. You will definitely want to try this one out, but FYI, this recipe is for two.


Feel free to blame Erik for the terrible picture. He left the house with the camera and all I had was my camera phone. Lame.


Time from Prep to Eating: 45 minutes

What You Need:
A clear 8x8 baking dish and a medium mixing bowl.

The Stuff:
1 small eggplant, cut lengthwise once then halved again, finish by cutting each quarter into 1” cubes
½ cup un-seasoned Panko bread crumbs
1 tsp Italian Seasoning
½ tsp garlic powder
¼ tsp salt
¼ tsp cracked black pepper
1 ¼ cup of the tomato sauce I reserved from the Garlic, Salami, and Tomatoes with Pasta recipe
Roughly half of an 8 ounce package of sliced Mozzarella cheese
Basil, hand torn

Here’s What You Do:
Preheat the oven to 400 degrees and lightly coat the baking dish with any nonstick cooking spray.

In the meantime, mix the Panko bread crumbs, Italian Seasoning, garlic powder, salt and pepper in the mixing bowl, then add and toss the cubed eggplant. It’s totally okay if the bread crumbs don’t stick entirely to all sides of the eggplant…the end result of this imperfection is amazing! Pour the entire mixture (including the extra bread crumbs) into the baking dish and evenly spread the tomato sauce on top. Bake in the oven for 25 minutes.

Remove dish from the oven and place 1 even layer of cheese on top. Place the dish back in the oven and broil for roughly 2 minutes until brown and bubbly.

Pair with any pasta of choice. YUM! Enjoy!!

Monday, April 12, 2010

Garlic butter

Time from Prep to Eating: 10 minutes (not including roasting the garlic)


What You Need:
A bowl and a fork.

The Stuff:
1 stick of salted butter, room temperature
1 small head of roasted garlic, cooled, skins removed (instructions follow)
1/8 tsp salt
1/8 pepper

Here’s What You Do:
For the roasted garlic I followed Ellie Krieger’s cookbook instructions and made this a couple days in advance when I found some extra garlic in my refrigerator. First, cut off the top 1/3 of the head of garlic and place in a shallow baking dish. Drizzle 1 Tbsp extra virgin olive oil and cover with tin foil. Place in a 375 degree oven for 30 minutes. Then remove the tin foil and bake for an additional 30-40 minutes. Ellie’s awesome!

Once the stick of butter and the garlic is at room temperature combine all ingredients into a bowl and smash with a fork. Mix until well combined.

Serve immediately or cover with plastic wrap and place in the refrigerator for up to 5 days.

Garlic, Salami, and Tomatoes with Pasta


Time Elapse from Prep to Eating: 45 minutes


What You Need:
A stock pot for boiling pasta and a sauté pan for the red sauce.

The Stuff:
1 lb pasta, recommend large shells, Rigatoni or Penne
4 garlic cloves, minced
1 small yellow onion, finely chopped
2 ounces of hard salami, cubed
1 Tbsp Extra Virgin Olive Oil
1 – 8 ounce can of tomato sauce
1 – 28 ounce can of San Marzano tomatoes
½ Tbsp dried Italian Seasoning
1/8 tsp each of salt and pepper
Big pinch of red pepper flakes
A good bottle of red wine, enough for one swirl around the sauté pan
1 Tbsp of parsley, chopped
1 Tbsp of basil, chopped
¼ cup parmesan cheese
4 small kalamata olives, roughly chopped

Here’s What You Do:
In the sauté pan, combine the extra virgin olive oil, garlic, onion, and salami over medium heat for about 5 minutes. Once the onions are translucent add the remaining ingredients from the tomato sauce to the red wine and simmer for 20 minutes. In the meantime, cook the pasta as directed on the box.

Spoon the sauce over the noodles to coat and top with the parsley, basil, kalamata olives, and parmesan cheese.

Best served with garlic buttered bread! Recipe follows.

Although Erik despises tomato-based pasta sauce he ate the sauce and complimented me by saying “I didn’t know red sauce could have so much flavor”…and then he ate some more.

Grilled Tomato, Basil, and Mozzarella Pizza

Time Elapse from Prep to Eating: 30 minutes


What You Need:
Turn on your gas grill on low heat (the lowest it will go) for 5 minutes. In the meantime:

The Stuff:
1 pre-made pizza crust, i.e. Boboli or something similar
1 small can of tomato sauce, or jarred pizza sauce
1 8oz. bag of shredded Mozzarella cheese
½ large tomato, sliced thin
1 clove garlic, minced
6 medium-to-large basil leaves, chiffonade (i.e. cut them width-wise into small strips to like confetti)
Red pepper flakes
Fresh cracked black pepper
Salt
Extra Virgin Olive Oil

Here’s What You Do:
1) On the pre-made crust, spoon the tomato or pizza sauce to desired thickness.
2) Evenly sprinkle the minced garlic, a small pinch of red pepper flakes, salt, and cracked pepper all over the sauce.
3) Top with the cheese.
4) Add the tomato slices.
5) Sprinkle the basil strips.
6) Place your finished pizza on the hot grill (low heat) for 10 minutes with the cover down, allowing for the cheese to melt.
7) When finished, remove pizza and drizzle lightly with Extra Virgin Olive Oil.
8) Enjoy!

Erik actually preferred the pieces with the tomato slices!!! Pigs must be flying somewhere…

Welcome!

So here it is, my first blog; and I’m writing about what I love most (besides my husband of course)…food! Not only do I love to eat, but I love to cook. I have spent countless hours and days watching Food Network, testing recipes, changing recipes, making new recipes, and convincing my husband to be my foodie guinea pig. As the world's most finicky eater, I can promise you that if he approves the dish, the rest of the world will too.

Now, I have never been to culinary school nor have I ever worked in a restaurant. If you’re reading this blog to uncover the tricks of the trade for cooking like a French chef, I’m sorry to say that you’ve come to the wrong place. But if you love food, love to eat, and have a yearning to discover this delicious journey called life…this is the Blogspot for you.

I’m writing to share my experiments and experiences and to inspire those who want to cook outside of the box or to-go bag. I promise to rejuvenate old recipes, bring a modern twist to classics, and test out new culinary trends. I will share my recipes, tips that I’ve discovered along the way, and, of course, my husband’s reactions!

For those who think they don’t have time to cook, the patience to try, or the know-how to just “put ingredients together,” perhaps I should tell you a few things about me first. For starters, I’m a career woman, a wife, a friend, and I try to stick to a workout routine (key word = try). I work 40+ hours a week, I don’t have a cleaning service to clean my home, and I can’t afford white truffles by the pound or Almas caviar. I’m not a cooking purist by any means; I actually like to eat out twice a week and every night I stay in doesn’t have to be a 5-star experience. I’ve been known to eat grilled cheese sandwiches with tomato soup on several occasions. Although kids aren’t in the picture now, they will be soon, and I intend to keep my cooking hobby alive. I’m no Julia Child, and I certainly won’t be competing to be the next Food Network Star; but I do the best with the time I have and the ingredients I can afford – and I love inspiring others to get in the kitchen and cook and sharing my recipes!

This week I’m on an Italian kick. Those that know me know that’s a rare occasion, as it’s never been on my top list of cuisines to eat, let alone cook. Give me a Mexican tamale, Lebanese fattoush salad, or German Weiner Schnitzel over a bowl of pasta any day! But this past weekend we bought two large basil plants and I found myself in the face of a challenge: Can I learn to love Italian food (or at least look forward to eating it)? My husband doesn’t like red sauce either – or tomatoes for that matter – so this was a real cooking challenge!

On the menu this week
Sunday: Grilled Tomato, Basil, and Mozzarella Pizza
Monday: Garlic, Salami, and Tomatoes with Pasta
Thursday: Eggplant Parmesan a la Carrie; and,
All week: Garlic butter with fresh sourdough bread